Introduction
Microphotography with microscopes that have a finite mechanical tube length (usually 160 or 170 mm) can sometimes be challenging because the photographic adaptation was optimized for old analog camera systems. Photographic projectives or projection eyepieces from the analog past are often difficult to use in a satisfying way with today's digital cameras with their relatively small sensors. When using those old projectives, mostly only a small portion of the field of view will be captured. A possible solution for this is afocal photography, in which the virtual image from a normal eyepiece is turned into a real image with a camera lens and projected onto the sensor. This setup usually works well, but it also can have some problems like hotspots, reflections and optical aberrations that are introduced by the camera objective. And in general the mechanical connection to the microscope is more complex. If you want to do focal photography with a projective, then hybrid eyepieces are a good solution, see also: 'Microphotography with 'hybrid' eyepieces'.
There is also another way to make a good projective from a normal eyepiece by increasing the distance between field lens and eye lens with an intermediate ring. There is some resemblance with a hybrid eyepiece, the difference however is that an existing eyepiece is modified by placing a ring between the barrel and the eye lens, so the eyepiece is being extended. The necessary spacers may come from other eyepieces. Carl Zeiss and Zeiss-Winkel eyepieces, for example, have a black ring on which the eyepiece rests in the tube. These rings can be removed from certain eyepieces. The rings from some Zeiss-Winkel eyepieces contain screw thread which makes it possible to insert them easily. For spacers that don't have screw thread I currently I don't have a good solution for attaching them other than using tape. But maybe it's possible to make spacers with screw thread using a 3D printer.
Zeiss Kpl8x
I modified a Carl Zeiss Kpl8x eyepiece with different rings that came from a Zeiss Kpl10x eyepiece (10.5mm), Kpl12.5x eyepiece (17mm) and Zeiss-Winkel 5x eyepiece (25mm). Only the ring of the Zeiss-Winkel eyepiece contains screw thread, which makes it possible to firmly screw the 3 parts together.
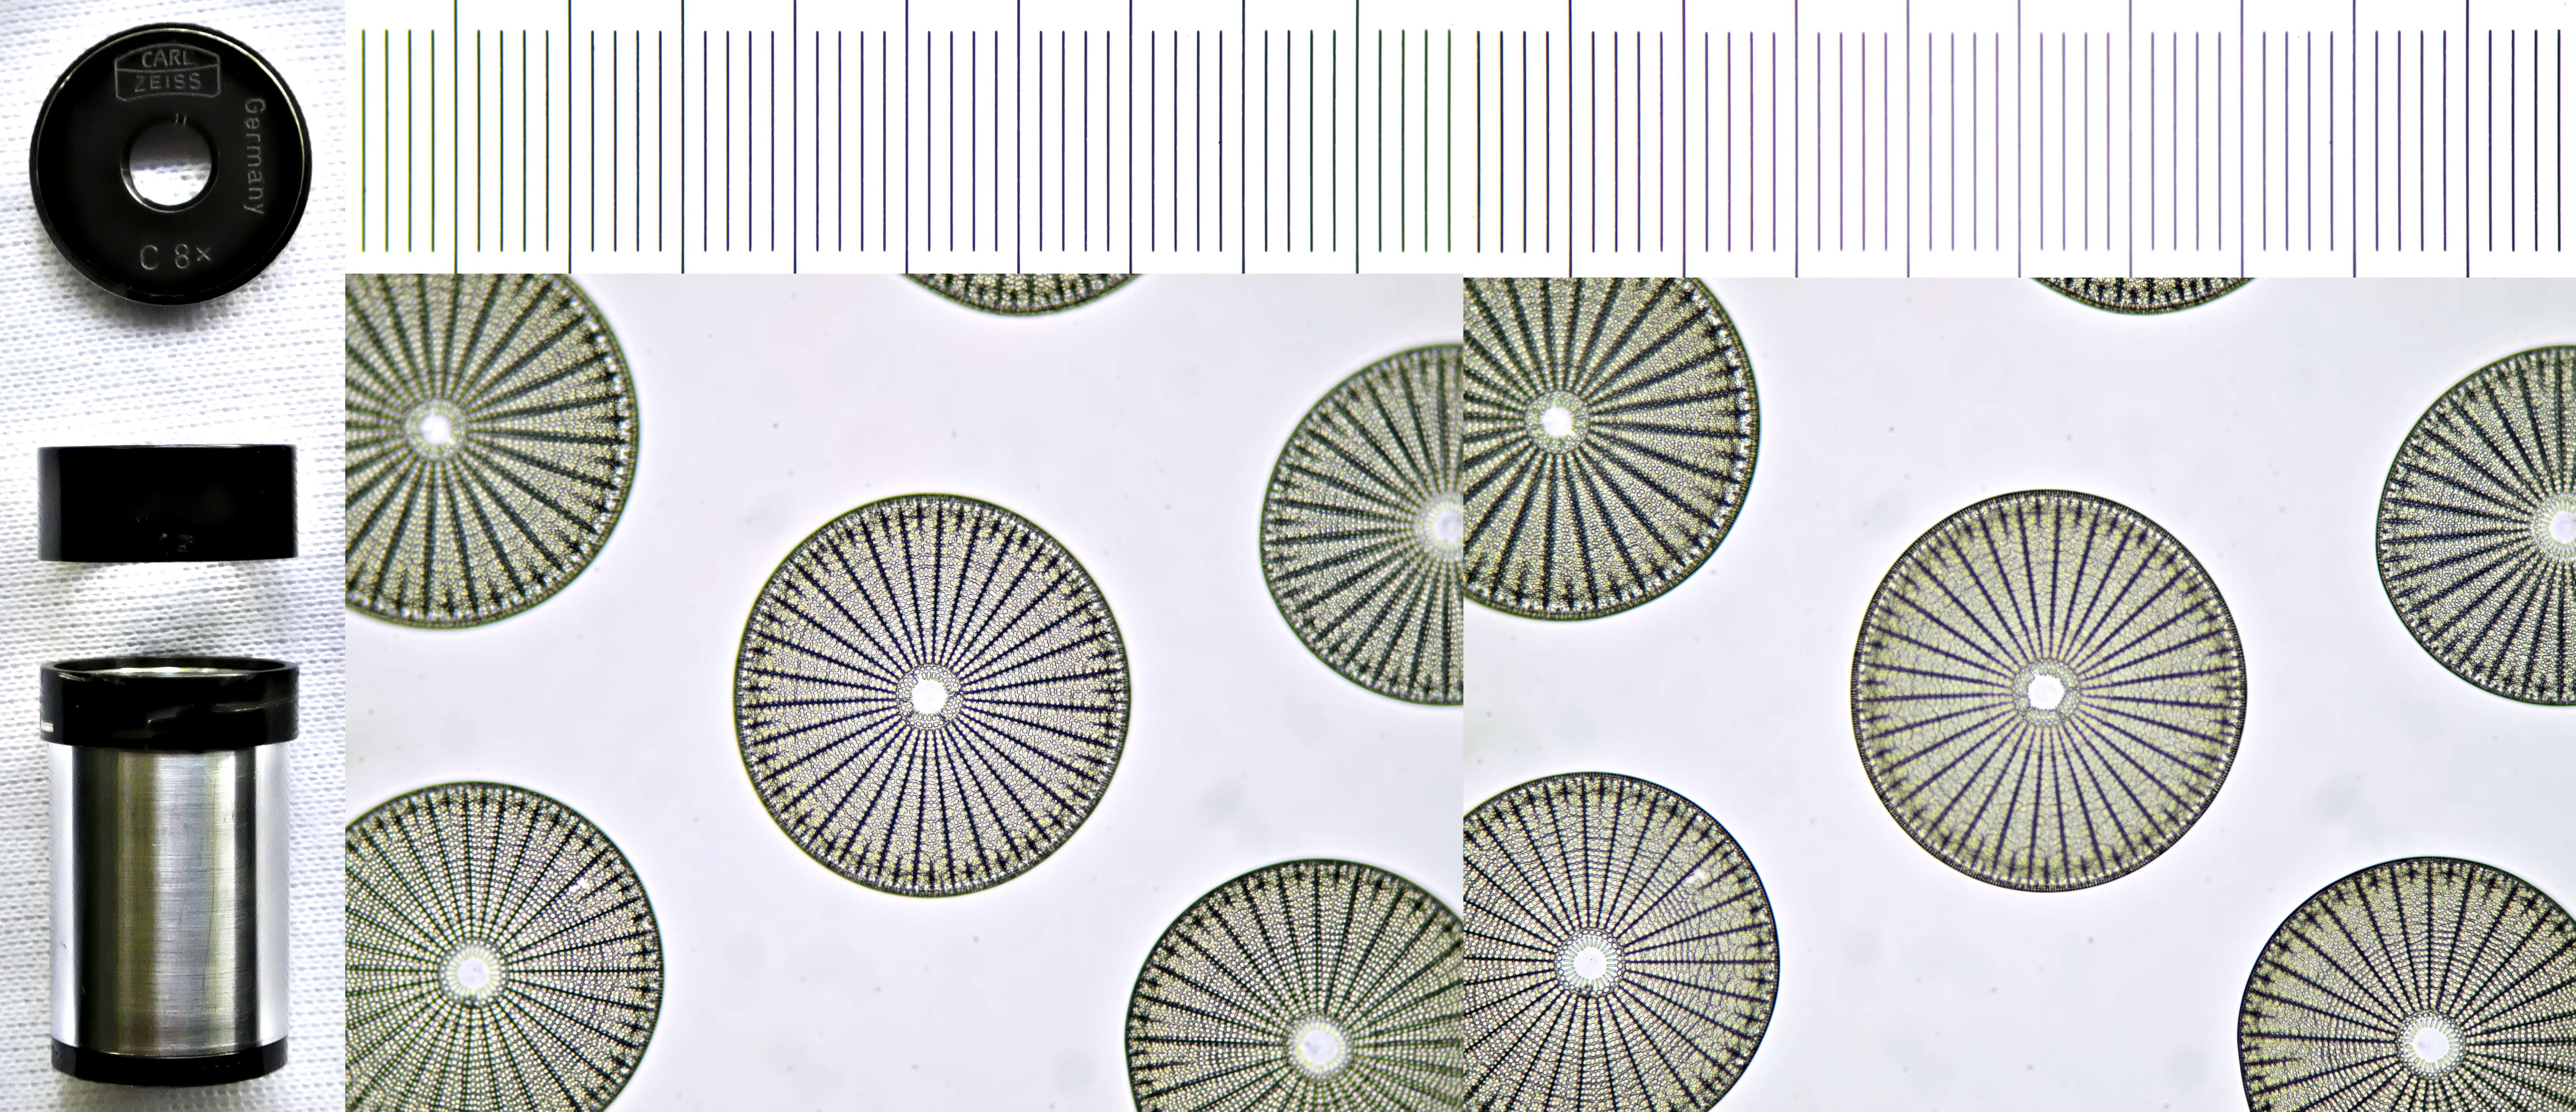
Projectives based on a Kpl8x eyepiece. The eye lens is unscrewed and an intermediate ring is fitted between the barrel and the eye lens. A: Intermediate ring of Kpl10x eyepiece, 10.5 mm. B: spacer ring of Kpl12.5x eyepiece, 17 mm. C: Intermediate ring from Zeiss-Winkel 5x eyepiece with screw thread, 25 mm. D: final projective with intermediate ring of Zeiss-Winkel 5x eyepiece.
Using a slide of the diatom Arachnoidiscus and a stage micrometer, I tested the various Kpl8x projectives with the Canon 600D camera. With decreasing length of the intermediate ring, a smaller part of the field of view will be captured and at a certain point there is no longer any vignetting.
From left to right (1-4): stage micrometer and Arachnoidiscus photographed with Kpl8x projective using different spacers. 1: intermediate ring Zeiss-Winkel 5x, 25 mm. 2: intermediate ring of Kpl12.5x, 17 mm. 3: intermediate ring of Kpl10x, 10.5 mm, but with an additional rubber ring extended to 12.5 mm. 4: intermediate ring of Kpl10x, 10.5 mm. Camera: Canon 600D. Objective: Carl Zeiss Plan 25/0.45.
With the Canon 600D there was still vignetting when the Kpl8x eyepiece was extended with a 17 mm intermediate ring, but for a micro 4/3 camera like the Olympus PEN E-Pl1, this configuration turned out to be very suitable.
Stage micrometer and Arachnoidiscus photographed with the Olympus PEN E-Pl1 camera using the Kpl8x eyepiece extended with a 17 mm intermediate ring. Objective: Carl Zeiss Plan 25/0.45. Image width: 540 μm.
For cameras with a smaller sensor such as the 1" Nikon1 J1 an intermediate ring of approximately 19 mm turned out to be optimal. For this I used the ring of a Kpl12.5x eyepiece and extended it with an additional 2 mm thick ring.
From left to right (1-3): Stage micrometer and Arachnoidiscus photographed with Kpl8x projective with different spacers. 1: intermediate ring Zeiss-Winkel 5x, 25 mm. 2: intermediate ring of Kpl12.5x, 17 mm, but with additional ring extended to 19 mm. 3: intermediate ring of Kpl12.5x, 17 mm. Camera: Nikon1 J1. Objective: Carl Zeiss Plan 25/0.45.
Zeiss C8x
The simplest and cheapest compensating eyepieces built by Zeiss were the C eyepieces. As a basis for a projective I used a C8x eyepiece with several extension rings varying in height from 9 - 10.5 mm. C8x eyepieces as such can hardly be used as projectives. When a C8x eyepiece is used in a raised position to function as a projective, the results will be poor. As soon as the extension ring is fitted, an excellent projection eyepiece is created. C-eyepieces have no plan correction, so the results with plan objectives will be slightly less good than with the optics of a Kpl eyepiece. Nevertheless, I found the results to be very reasonable even with plan objectives. But preferably, one would like to use this projective with non-plan objectives. Also with better corrected objectives such as Neofluars and apochromats satisfactory results were obtained.
For the picture below I used a more recent (black) Zeiss 25/0.45 achromat and focused both in the center and on the edge of the viewfield.
Far left: conversion of a C8x eyepiece to a projective in which the eyepiece is extended with the 10.5 mm ring of a Kpl10x eyepiece. The other two images show a stage micrometer and Arachnoidiscus photographed with the modified eyepiece. Focussed in the center (middle photo) and at the edge (right photo). Camera: Olympus PEN E-Pl1. Objective: Zeiss 25/0.45. Image width: 490 μm.
A method that is often used to make a normal eyepiece function as projective is to raise the position of the eyepiece in the phototube. The results of this are very variable and it strongly depends on the type of eyepiece how the results are. Especially with simpler eyepieces, the results can be very poor. That also applies to the Zeiss C8x eyepiece. I used this eyepiece as a projective by raising it about 5mm in the tube. I compared the image I got from the raised eyepiece with the image from the modified eyepiece.
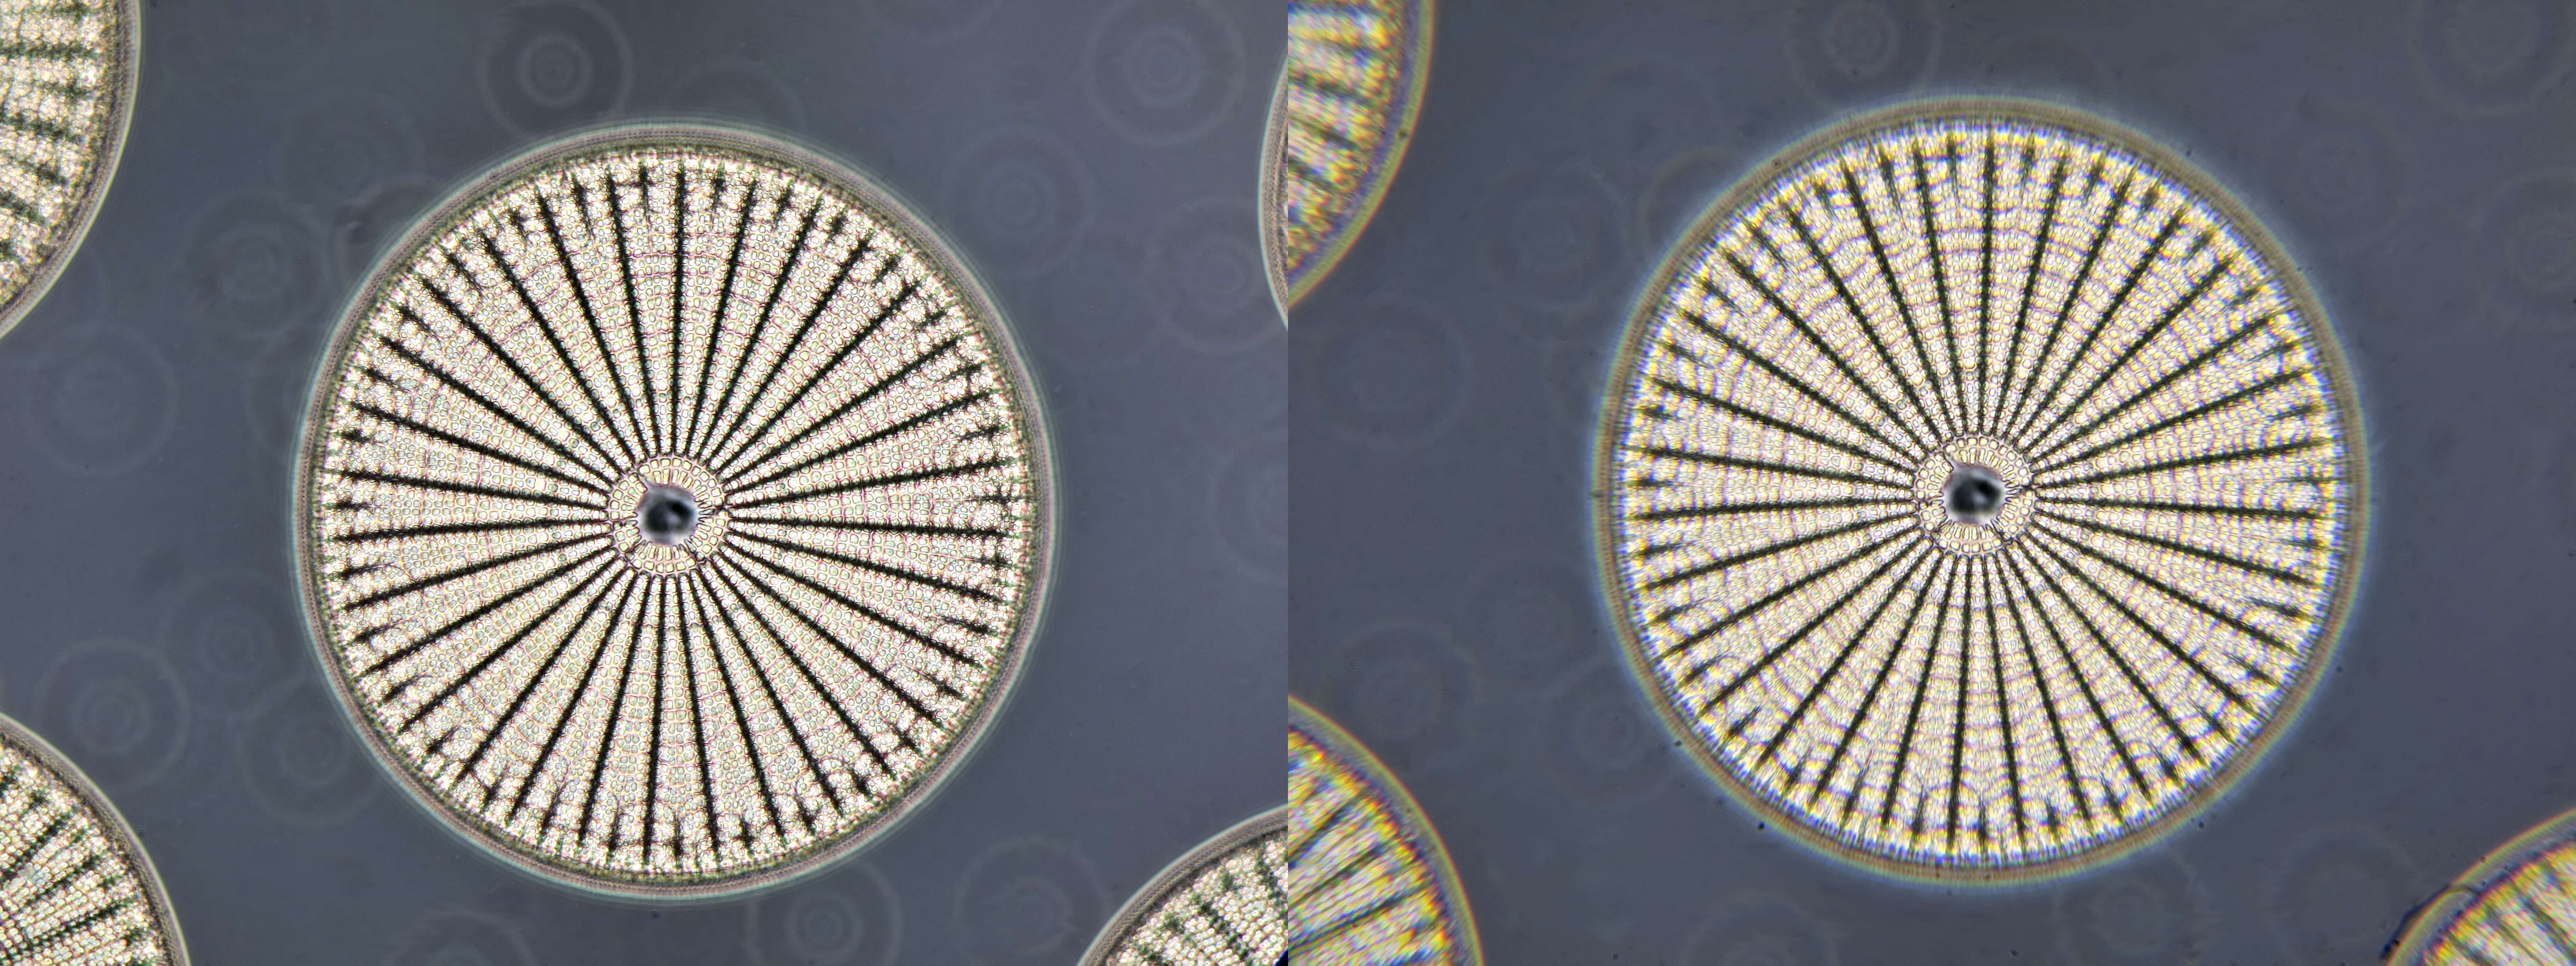
Arachnoidiscus photographed in phase contrast with Neofluar 40/0.75 Ph2. On the left, the C8x eyepiece was extended by 10.5 mm and used as a projective. On the right, an unmodified C8x eyepiece was raised appoximately 5mm in the tube. The right image is severely degraded due to distortion and chromatic aberration.
When a C8x eyepiece is extended by 9-10 mm, an APS-C sensor will be exposed without vignetting. The next image was taken with an older Carl Zeiss Apo 40/1.0 (Zeiss Opton type) and the Canon 600D. Of course, this objective gives some field curvature and this is also visible at the edges of the image. The C8x eyepiece was extended by 9 mm and considering the fact that C8x eyepieces are very simple eyepieces, the photographic result is quite good.

Diatom strew photographed with oblique lighting and Carl Zeiss Apo 40/1.0. With a C8x eyepiece that was extended by 9 mm, the image was projected onto the sensor of the Canon 600D. Image width: 340 μm.

Stage micrometer photographed with Carl Zeiss Apo 40/1.0 and Canon 600D. Upper image: C8x eyepiece extended by 9 mm. Lower image: normal C8x eyepiece placed at a raised position in the tube. The comparison shows once again that a normal C8x eyepiece is hardly usable as a projection eyepiece.

Stage micrometer and histological slide photographed with Carl Zeiss 25/0.45 and a C8x eyepiece extended by 10 mm. Despite the missing plan correction of C8x eyepieces, this result is still quite reasonable. Camera: Canon 600D. Image width: 550 μm.
In the following test I compared the result from a 10.5 mm extended C8x eyepiece as projective with the afocal method, where I used a Kpl10x eyepiece. The test was done with the Olympus PEN E-Pl1 camera and for the afocal method a Sigma 30 mm objective was used as the camera lens.
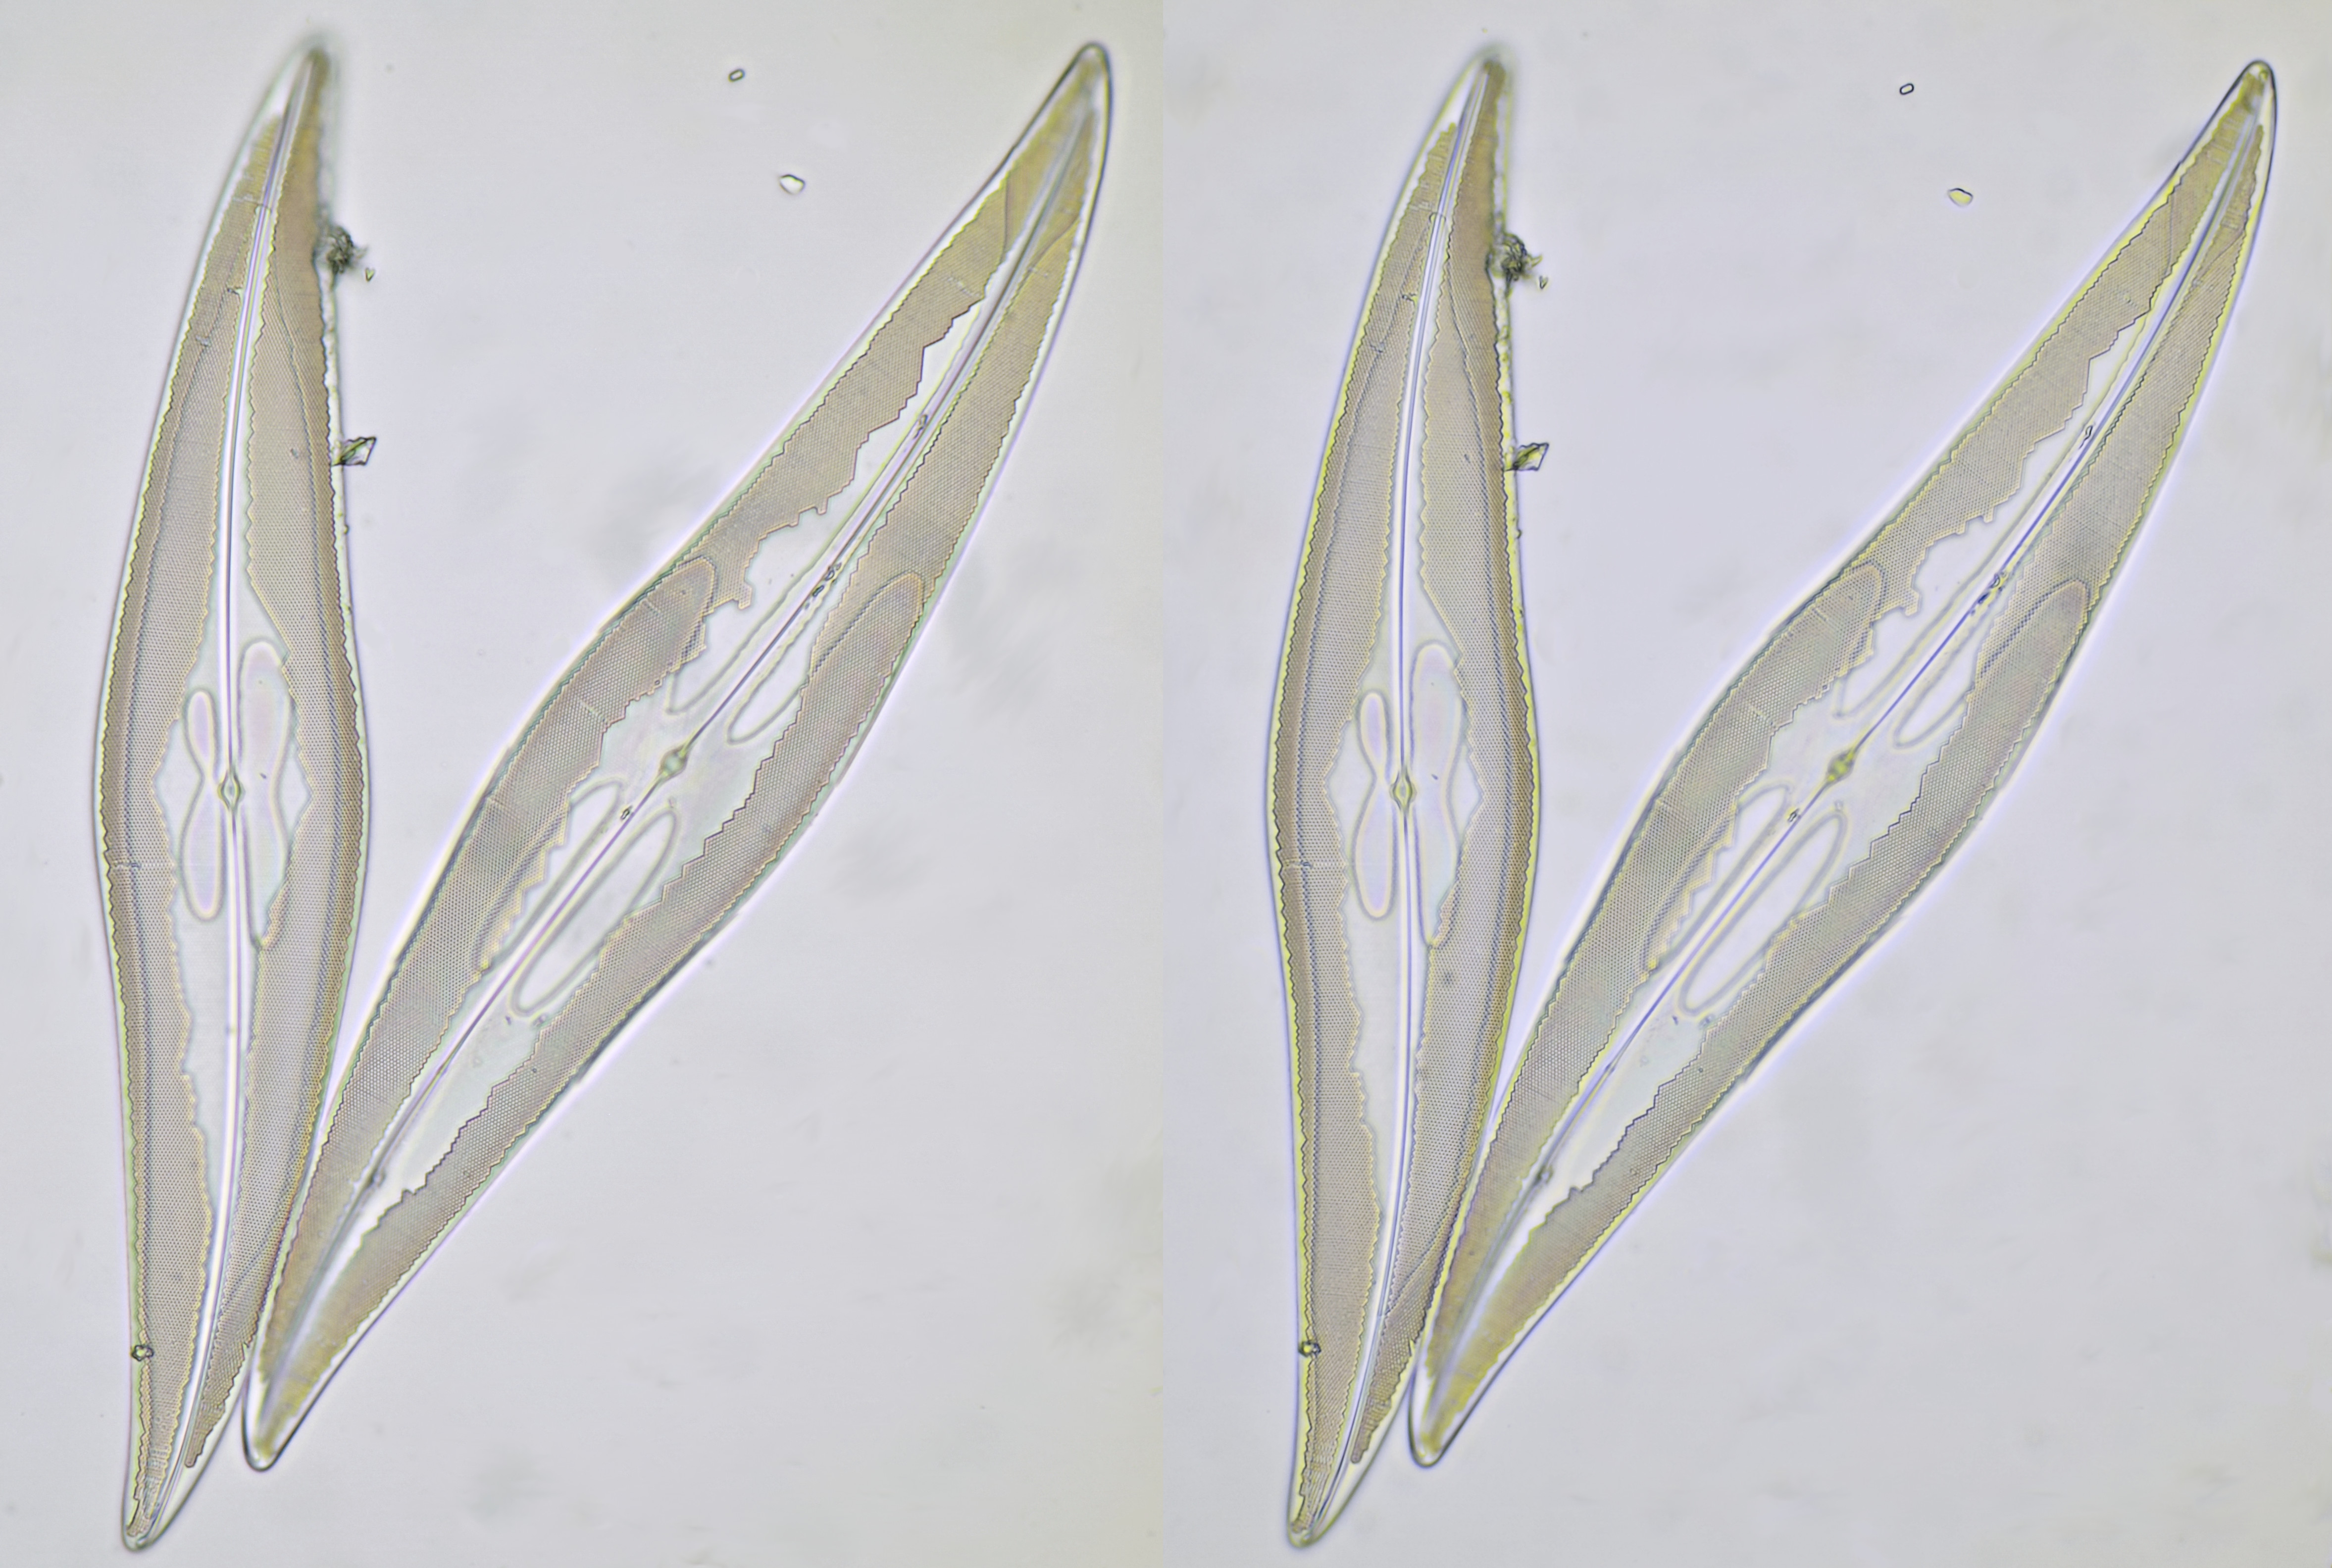
Pleurosigma angulatum photographed with 10.5 mm extended C8x eyepiece (left) and afocal method (right). For the right photo, a Kpl10x eyepiece was used in combination with a Sigma 30 mm lens. The photo made with the extended C8x eyepiece is in no way inferior to the afocal method. The two diatoms took up a large part of the field of view so the photos are not just a small part of the center. In order to properly assess the photos, it is recommended to enlarge the image so that the structure is more visible. Personally, I find the left image more neutral and I think it contains less residual colours. Objective: Carl Zeiss Neofluar 40/0.75. Camera: Olympus PEN E-Pl1.
Leitz Periplan GF10x
The Leitz Periplan eyepieces are excellent eyepieces for both visual observation and photography. A Periplan GF10x is often used for afocal photography, and this eyepiece can also be used to make a very good projective by increasing the distance between the field lens and the eye lens. By extending the Periplan GF10x eyepiece by 8-10 mm, a projective is created that is suitable for APS-C and micro 4/3 sensors. For smaller sensors, a higher ring (15 mm or more) is used. The Periplan GF10x eyepiece was extended with different extension rings and tested with different cameras. The height of the ring (and thus the lenght of the eyepiece) increases as the sensor gets smaller. The rings were manufactured with a 3D printer. The images were made with the Leitz Dialux II microscope, a system with a mechanical tube length of 170 mm. With all cameras, the image was completely parfocal with the visual image. The correct distance from eyepiece to sensor is the distance where the image is parfocal. Is is easy to set this distance by using a camera adapter that allows changing the height of the camera.
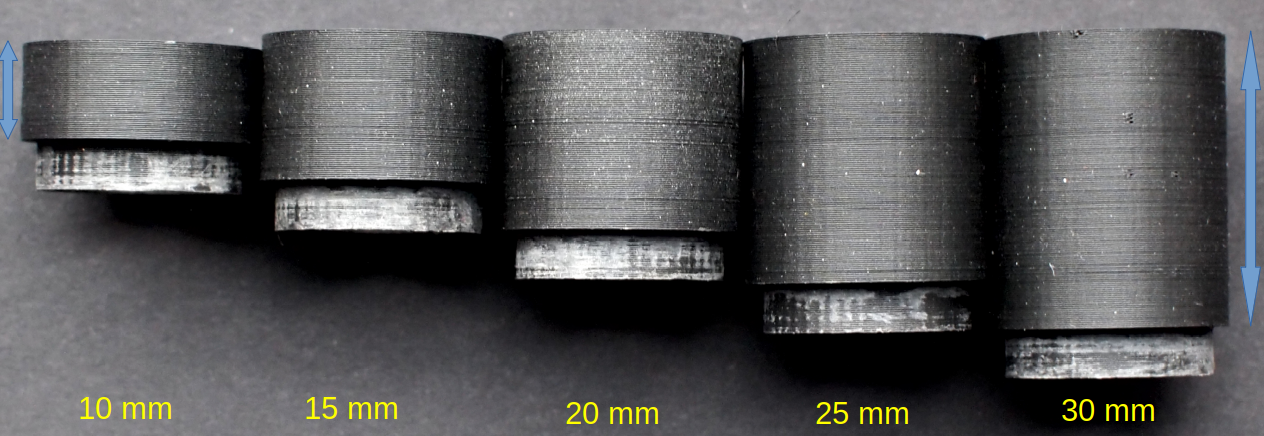
Extension rings with different heights, made with a 3D printer. The rings can be slid into the barrel and the eye lens is placed on top.
Construction and placement of a Periplan GF10x eyepiece that was extended by 15 mm for photography with the Nikon 1 J1 camera. A: normal Periplan GF10x eyepiece. B: a 15 mm ring is placed between the barrel and the eye lens. C: extended Periplan GF10x eyepiece. D: placement of extended eyepiece in the photo tube of the Leitz Dialux-II. E: camera adaptation with the Nikon 1 J1 camera on the Leitz Dialux-II. Due to the very short projection distance of the eyepiece, a compact setup is possible.
Stage micrometer and histological slide photographed with Leitz Pl Apo 25/0.65 (170 mm) and a Periplan GF10x eyepiece extended by 10 mm. Camera: Canon 600D. Image width: 690 μm. There is a slight vignetting that will disappear when a 1-2 mm shorter ring is used.
Stage micrometer and Arachnoidiscus photographed with Leitz Pl Apo 25/0.65 (170 mm) and a Periplan GF10x eyepiece extended by 10 mm. Camera: Olympus PEN E-Pl1. Image width: 560 μm.
Stage micrometer and kidney tissue of the common frog photographed with Leitz Pl Apo 25/0.65 (170 mm) and a Periplan GF10x eyepiece that was extended by 15 mm. Camera: Nikon 1 J1. Image width: 570 μm.

Stage micrometer and kidney tissue of the common frog photographed with Leitz NPL Fluotar 40/0.70 (160 mm) and a Periplan GF10x eyepiece that was extended by 30 mm. Camera: Touptek 5 MP (1/2.5" sensor). Image width: 300 μm.
Eyepiece extension through the use of a longer barrel
It's also possible to extend an eyepiece by taking a longer barrel from, for example, a foreign eyepiece and then screw the field lens and eye lens of the original eyepiece onto it. The extended eyepiece is then raised in the foto tube so that the field lens is in exactly the same position as when the original eyepiece is used. I extended the Periplan GF10x eyepiece in this way by using the barrel of a Reichert 5x eyepiece. The length of the Reichert barrel, only the metal part, was 48.5 mm. The barrel of the original Periplan GF10x eyepiece was 37 mm long. The extended eyepiece is thus placed 48.5 - 37 = 11.5 mm raised in the tube. To avoid vignetting, I removed the diaphragm from the Reichert barrel.
I tested this combination with Leitz 45 mm and 37 mm objectives calculated for a mechanical tubelenght of 170 mm. This projective is particularly suitable for Leitz 45 mm objectives, because here, the required compensation is the same for all objectives. This was not yet the case with Leitz objectives with a length of 37 mm and only 37 mm objectives ≥ 25/0.50 give satisfactory results. The combination is suitable for cameras with APC-C and micro 4/3 sensors and is completely parfocal.
Extension of a Leitz Periplan GF10x eyepiece to be used as a projective. 1A/2A: original Periplan GF10x eyepiece. B: barrel of a Reichert 5x eyepiece with a length of 48.5 mm. There was a clamping ring around the barrel that could be used very conveniently to place the extended eyepiece in a raised position in the tube. Instead of this ring, a normal rubber ring can of course also be used. C: lower part of original Periplan GF10x eyepiece (left) and Reichert 5x barrel with Periplan GF10x field lens (right). The clamping ring is placed at a position so that the part that goes into the tube is exactly the same length as with the original eyepiece. D: Extended Periplan GF10x eyepiece where the distance between field lens and eye lens is 11.5 mm longer. The eyepiece is then placed 11.5 mm higher in the foto tube. E: camera setup with Canon 600D and extended eyepiece on the Leitz Dialux II. Due to the short projection distance of the eyepiece, a very compact setup is possible.
Stage micrometer and histological slide of the stomach of a common frog photographed with Leitz Pl Apo 25/0.65. The image was projected onto the sensor of the Canon 600D by means of the eyepiece described above. Image width: approx. 670 μm.
In principle, any eyepiece barrel that is longer than the barrel of an original Periplan GF10x eyepiece can be used as an extension. The smaller the difference in length, the smaller the part of the field of view that is photographed. For the following photos I screwed the field lens and eye lens of the Periplan GF10x eyepiece onto the barrel (44mm long) of a Leitz 6x eyepiece. So the difference is 44 - 37 = 7 mm. This eyepiece is then placed in the tube and raised 7 mm. Here too I removed the diaphragm from the barrel of the Leitz 6x eyepiece. The part of the field of view that is being photographed is a lot smaller than with the previous combination.
Stage micrometer and a stained slide of a leaf section of Rosmarinus officinalis photographed with Leitz Pl Apo 25/0.65 and Periplan GF10x extended with the 44mm barrel of a Leitz 6x eyepiece. Camera: Canon 600D.
This combination also turned out to be suitable for cameras with a full-frame sensor. When using a Canon EOS 5D Mark IV, only very slight vignetting was visible with a parfocal setup. By slightly increasing the distance from the camera to the eyepiece, the sensor was fully exposed. At this distance, the image was no longer parfocal, but only minor post-focusing was required.
Leitz Periplan GF6.3x
Leitz Periplan GF6.3x eyepieces are somewhat less common than GF10x eyepieces. When this eyepiece is extended by 10mm, a smaller part of the field of view is parfocally being captured than with an extended GF10x eyepiece but there is no more vignetting with an APS-C sensor. This combination might be suitable for cameras with a slightly larger sensor than APS-C.
Stage micrometer and pollen of Clivia miniata photographed with Leitz Pl Apo 25/0.65 (170 mm) and a Periplan GF6.3x eyepiece that was extended by 10 mm. Camera: Canon 600D. Image width: 500 μm.
Olympus P7x
Olympus has produced a number of different eyepieces to be used with objectives of 37 mm parfocal lenght. These eyepieces were especially intended for photography and one type were the P-series. P-eyepieces have good correcting properties and they work best with objectives that require this correction such as the planachromats, achromats > 20x, fluorite objectives and apochromats. P-eyepieces were made with magnifications 5x, 7x, 10x and 15x. I have not yet come across a P5x eyepiece and I suspect that this is quite rare. As a basis for building a projective I used a P7x eyepiece. There are different versions of P7x eyepieces, in the way they are constructed. It is important that exactly the eyepiece shown below is used. If this eyepiece is extended by 10-11 mm, a projective is created that is very suitable for an APS-C sensor.
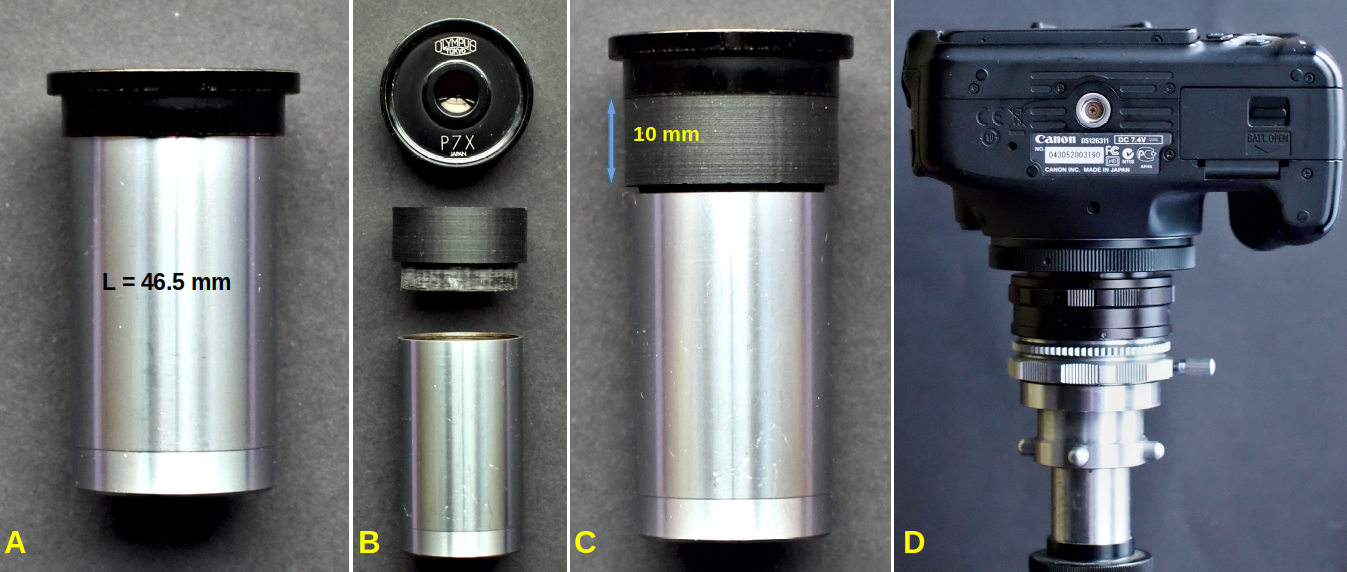
P7x eyepiece that was extended with a 10 mm ring. A: original P7x eyepiece with a total length of 46.5 mm. B: placement of a 10 mm intermediate ring. C: extended P7x eyepiece. D: coupling of the Canon 600D camera to the tube of an Olympus HSA microscope.

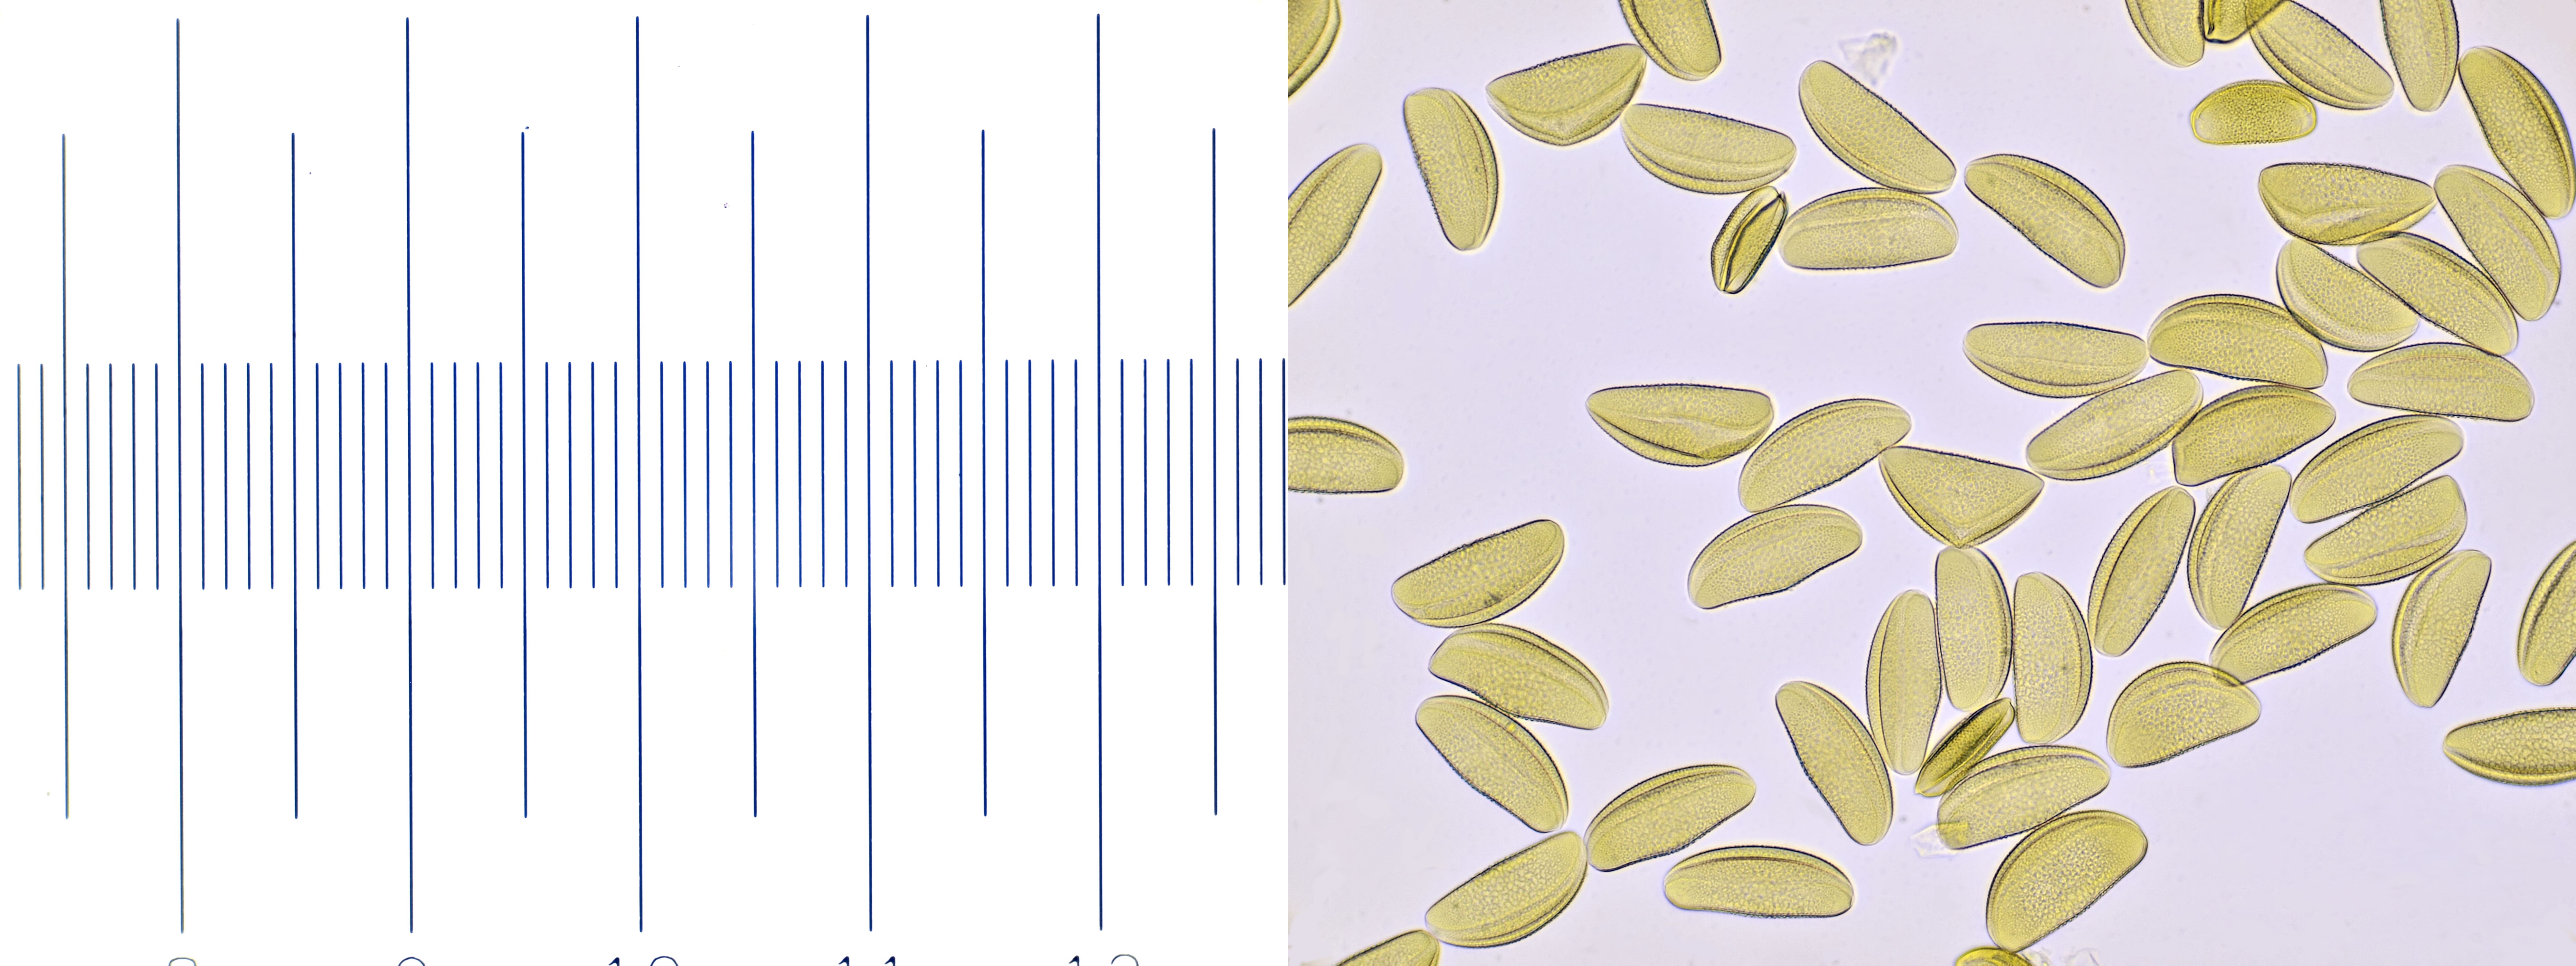
Stage micrometer and stem section of Tilia photographed with Olympus Plan 20/0.40 (37 mm parfocal length) and a P7x eyepiece extended by 10 mm. Camera: Canon 600D. Image width: 740 μm.
Olympus P10x
Olympus P10x eyepieces were very common eyepieces and are therefore easy to find on the used market. When this eyepiece is extended by 10-11 mm, a projective is created that can be used with micro 4/3 and 1" sensor cameras. I removed the diaphragm inside the P10x eyepiece because otherwise vignetting occurs when using a micro 4/3 camera.
Stage micrometer and pollen of Clivia miniata photographed with Olympus Plan 20/0.40 (37 mm parfocal length) and a P10x eyepiece that was extended by approximately 10 mm. Camera: Olympus PEN E-Pl1. Image width: 555 μm.
For the next test, I extended an Olympus P10x eyepiece by 14 mm and I used a ring from a Zeiss-Winkel 6.3x eyepiece for this. I used the resulting projective in combination with a BRESSER MikrOkular Full HD eyepiece camera. I compared the result with the situation when the eyepiece camera is used without optics and is placed into an empty tube, as is actually the intention with these types of cameras. If no optics are present, this eyepiece camera can cause a very uneven illumination with a disturbing 'hotspot': a brightly lit spot in the center of the image. The uneven illumination mainly occurred when I used my Olympus HSA and GB, both classic horseshoe stands. When using the P10x eyepiece extended by 14 mm, a uniform illumination without a hotspot was obtained.
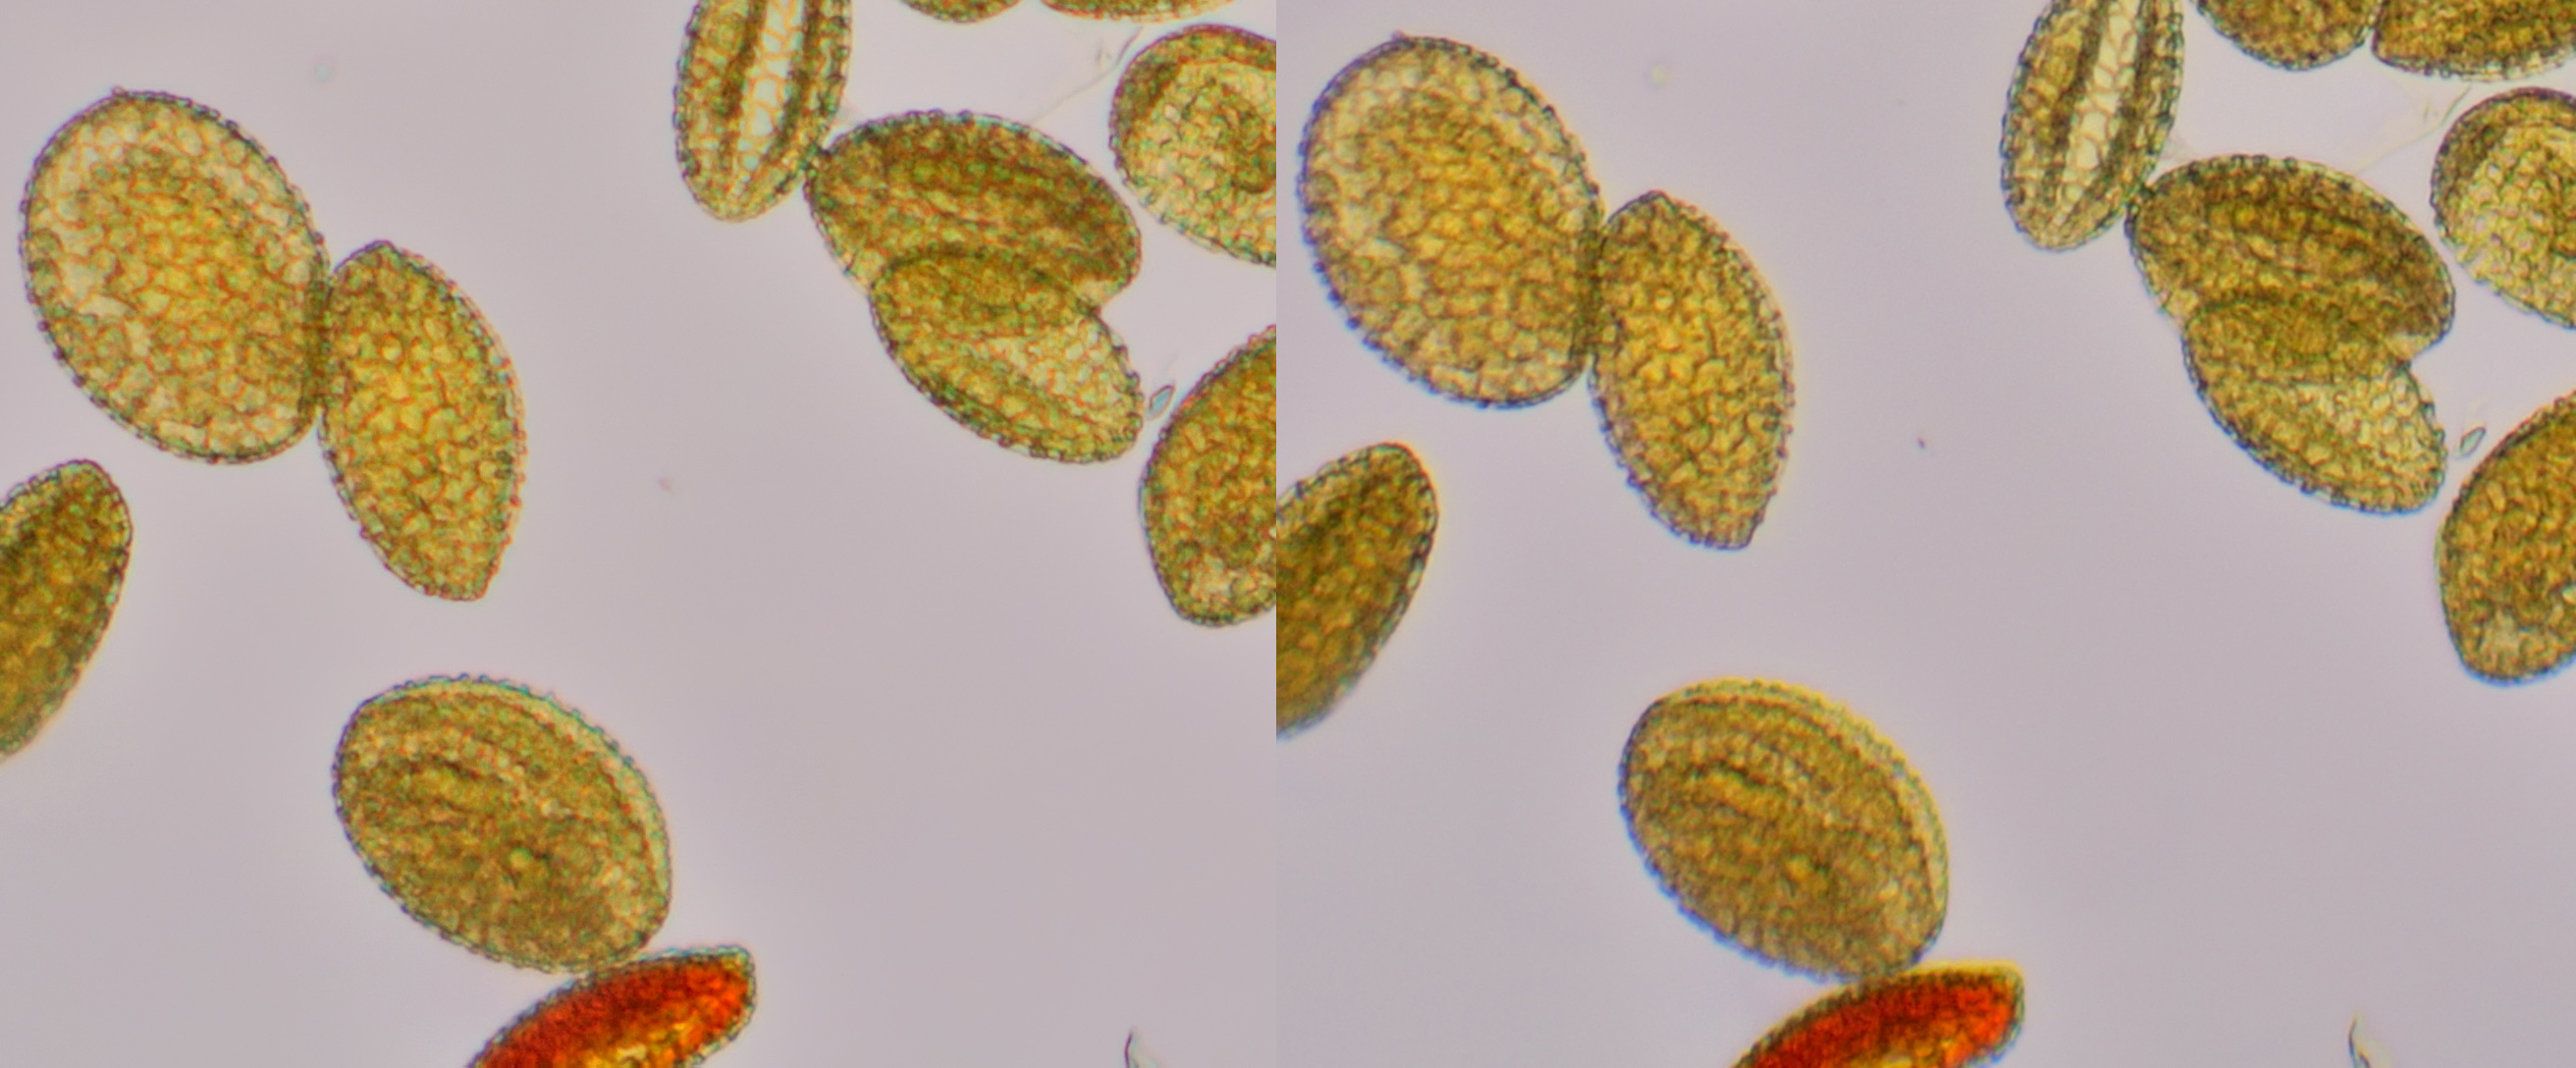
Pollen of Taraxacum officinale (Dandelion) photographed with Olympus F40/0.65 and BRESSER MikrOkular Full HD eyepiece camera on an Olympus GB microscope. Left: eyepiece camera without optics placed in the tube, resulting in an uneven illumination with a hotspot. Right: eyepiece camera used in combination with an extended P10x eyepiece (extended by 14 mm) which drastically improves the image: even illumination and correction of chromatic aberration.
Olympus 10x
As noted earlier, P eyepieces are preferably used with objectives that require the compensating effect of these eyepieces. All low power non-plan achromats (< 20/0.40) will require less compensation and for these objectives it is recommended to use a regular Olympus 10x eyepiece. The effect of the correction of a P-eyepiece on the image of low power achromats becomes clear in the following photographs. Here an Olympus 10/0.25 objective (37mm) is used with both an extended P10x eyepiece and an extended 10x eyepiece.
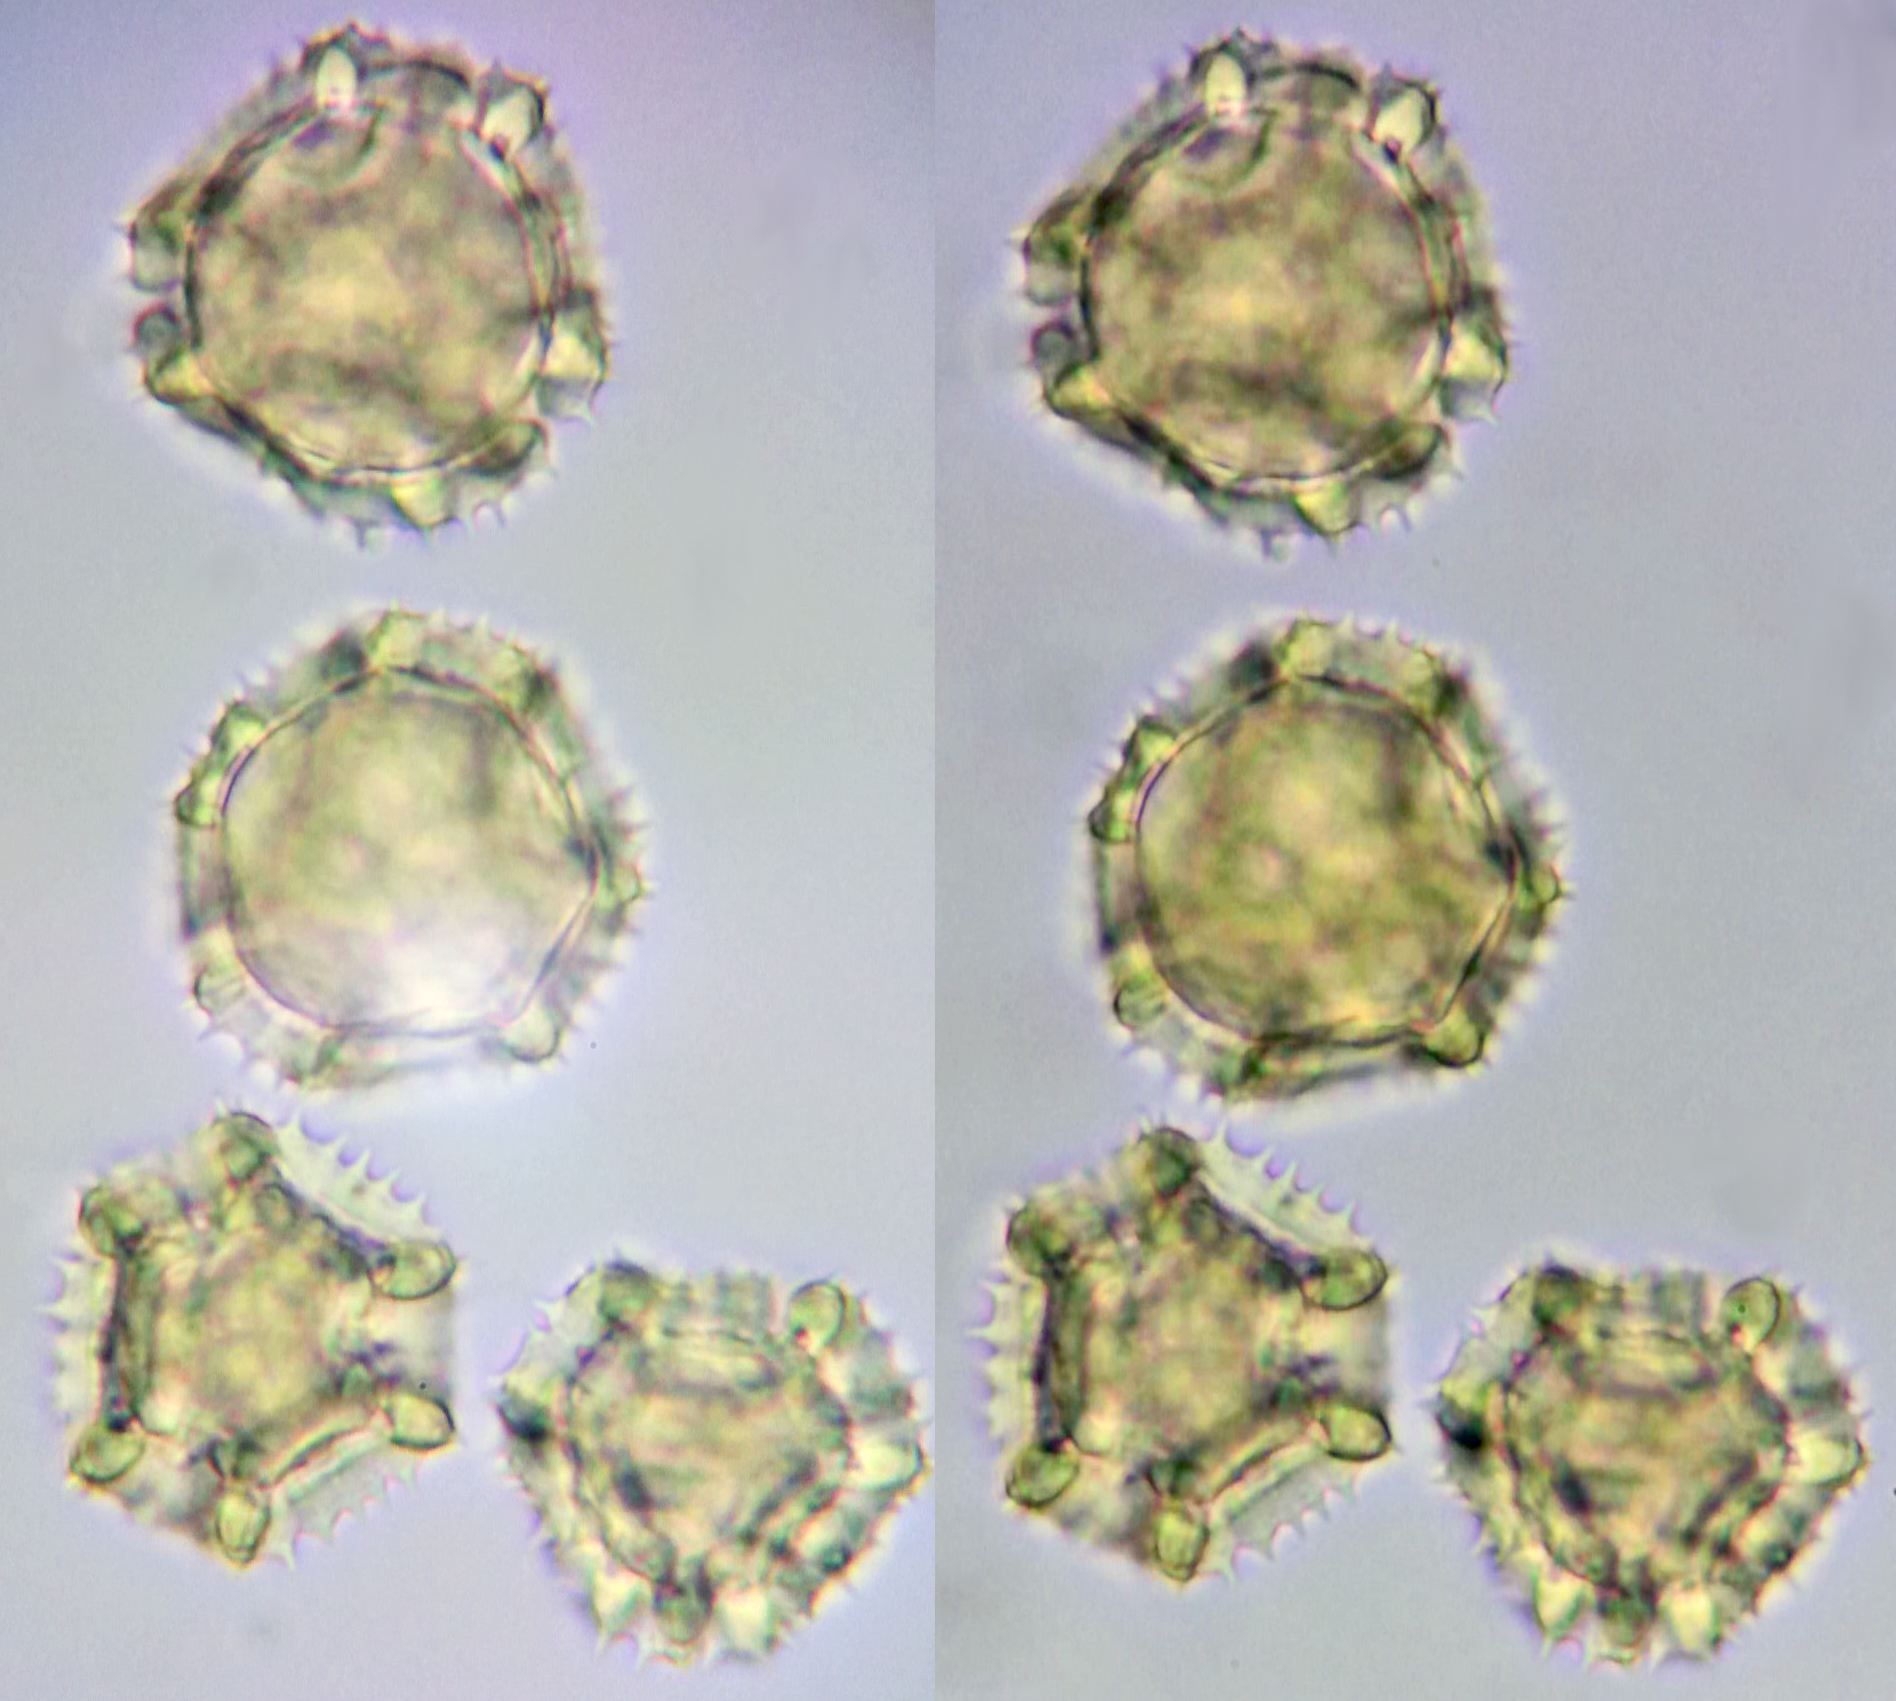
Pollen from a Lily photographed with Olympus 10/0.25. Left: Olympus 10x eyepiece, extended 10 mm. Right: Olympus P10x eyepiece, extended 10 mm. On the right, the pollen grains are surrounded by more intens colour fringes and some are distorted and unsharp. Camera: Nikon 1 J1.
Conclusion
Normal eyepieces can easily be converted into good quality projectives by increasing the distance between the field lens and the eye lens. Even simple eyepieces such as the Zeiss C eyepieces can be modified in this way to be useful as a good projective. Zeiss C-eyepieces are easy to find at low prices on the second-hand market, making it attractive for users of 160 mm Zeiss microscopes to use them for focal photography.
Note: when mentioning this method at other locations please refer to this site.