Introduction
Normally, phase-contrast illumination requires a special condenser. Such condensers are generally quite expensive, easily costing €100-200 secondhand. If you have a microscope with one or more phase contrast objectives but no phase condenser, it's still possible to achieve the phase contrast effect with a standard brightfield condenser. I've previously described one such option here: A low-budget condenser for darkfield, phase contrast and circular oblique illumination.
Another option is to use a slide with a round black sticker attached. It's best to place a black sticker on both sides of the slide. The optimal diameter of the black sticker depends on the microscope and condensor type. For Zeiss Standard, for example, I've used stickers with a diameter of 12 mm and 19 mm for Ph1 and Ph2/Ph3 objectives, respectively. These round stickers are available at office supply stores. A deviation of 1-2 mm from this diameter probably won't make much difference; this can be compensated for by adjusting the condenser's height.
Instead of a microscop slide, a round disk (filter) that fits in the filter holder can also be used. The disadvantage, however, is that there is less freedom in centering the phase stop. Therefore, the microscope slide method is preferred.
To test the phase contrast effect, it's best to use cheek epithelial cells as the sample. To do this, scrape one or both cheeks with a toothpick and then suspend the sample in a small drop of water. Below are some experiments using different types of microscopes.
Zeiss Standard
With a Zeiss-Standard and a swingout condenser NA 0.9, a slide is used that is covered with 12 mm or 19 mm black round stickers. The stickers are applied asymmetrically, towards one side of the slide, so not in the middle. The slide is now placed on the filter holder, with the side with the stickers closest to the edge pointing inwards. For Ph1 objectives, a slide with 12 mm stickers is used, for Ph2 and Ph3 objectives, a slide with 19 mm stickers. The procedure is now as follows:
1. Set up the microscope according to Köhler's method so that everything is centered.
2. Place the slide on the filter holder.
3. Fully open the field diaphragm and condenser diaphragm and set the condenser to its highest position.
4. The front lens of the 0.9 condenser is swung out for Ph1 and Ph2 objectives; for Ph3 objectives, the front lens remains in the optical path.
5. Observe the initial situation with a phase telescope.
6. Adjust the position of the slide so that the black circle is centered.
7. Lower the condenser until no light is visible within the phase ring of the objective. If necessary, re-center the black cirkel.
8. Close the condenser diaphragm until no light is visible outside the phase ring of the objective.
9. Only the phase ring of the objective is now visible, and phase contrast is now set.
Note: If an auxiliary lens is present, it must be swung out if an additional lens is already screwed into the bottom of the condenser. If the condenser does not have an additional lens screwed in, any auxiliary lens present must be put into the optical path.
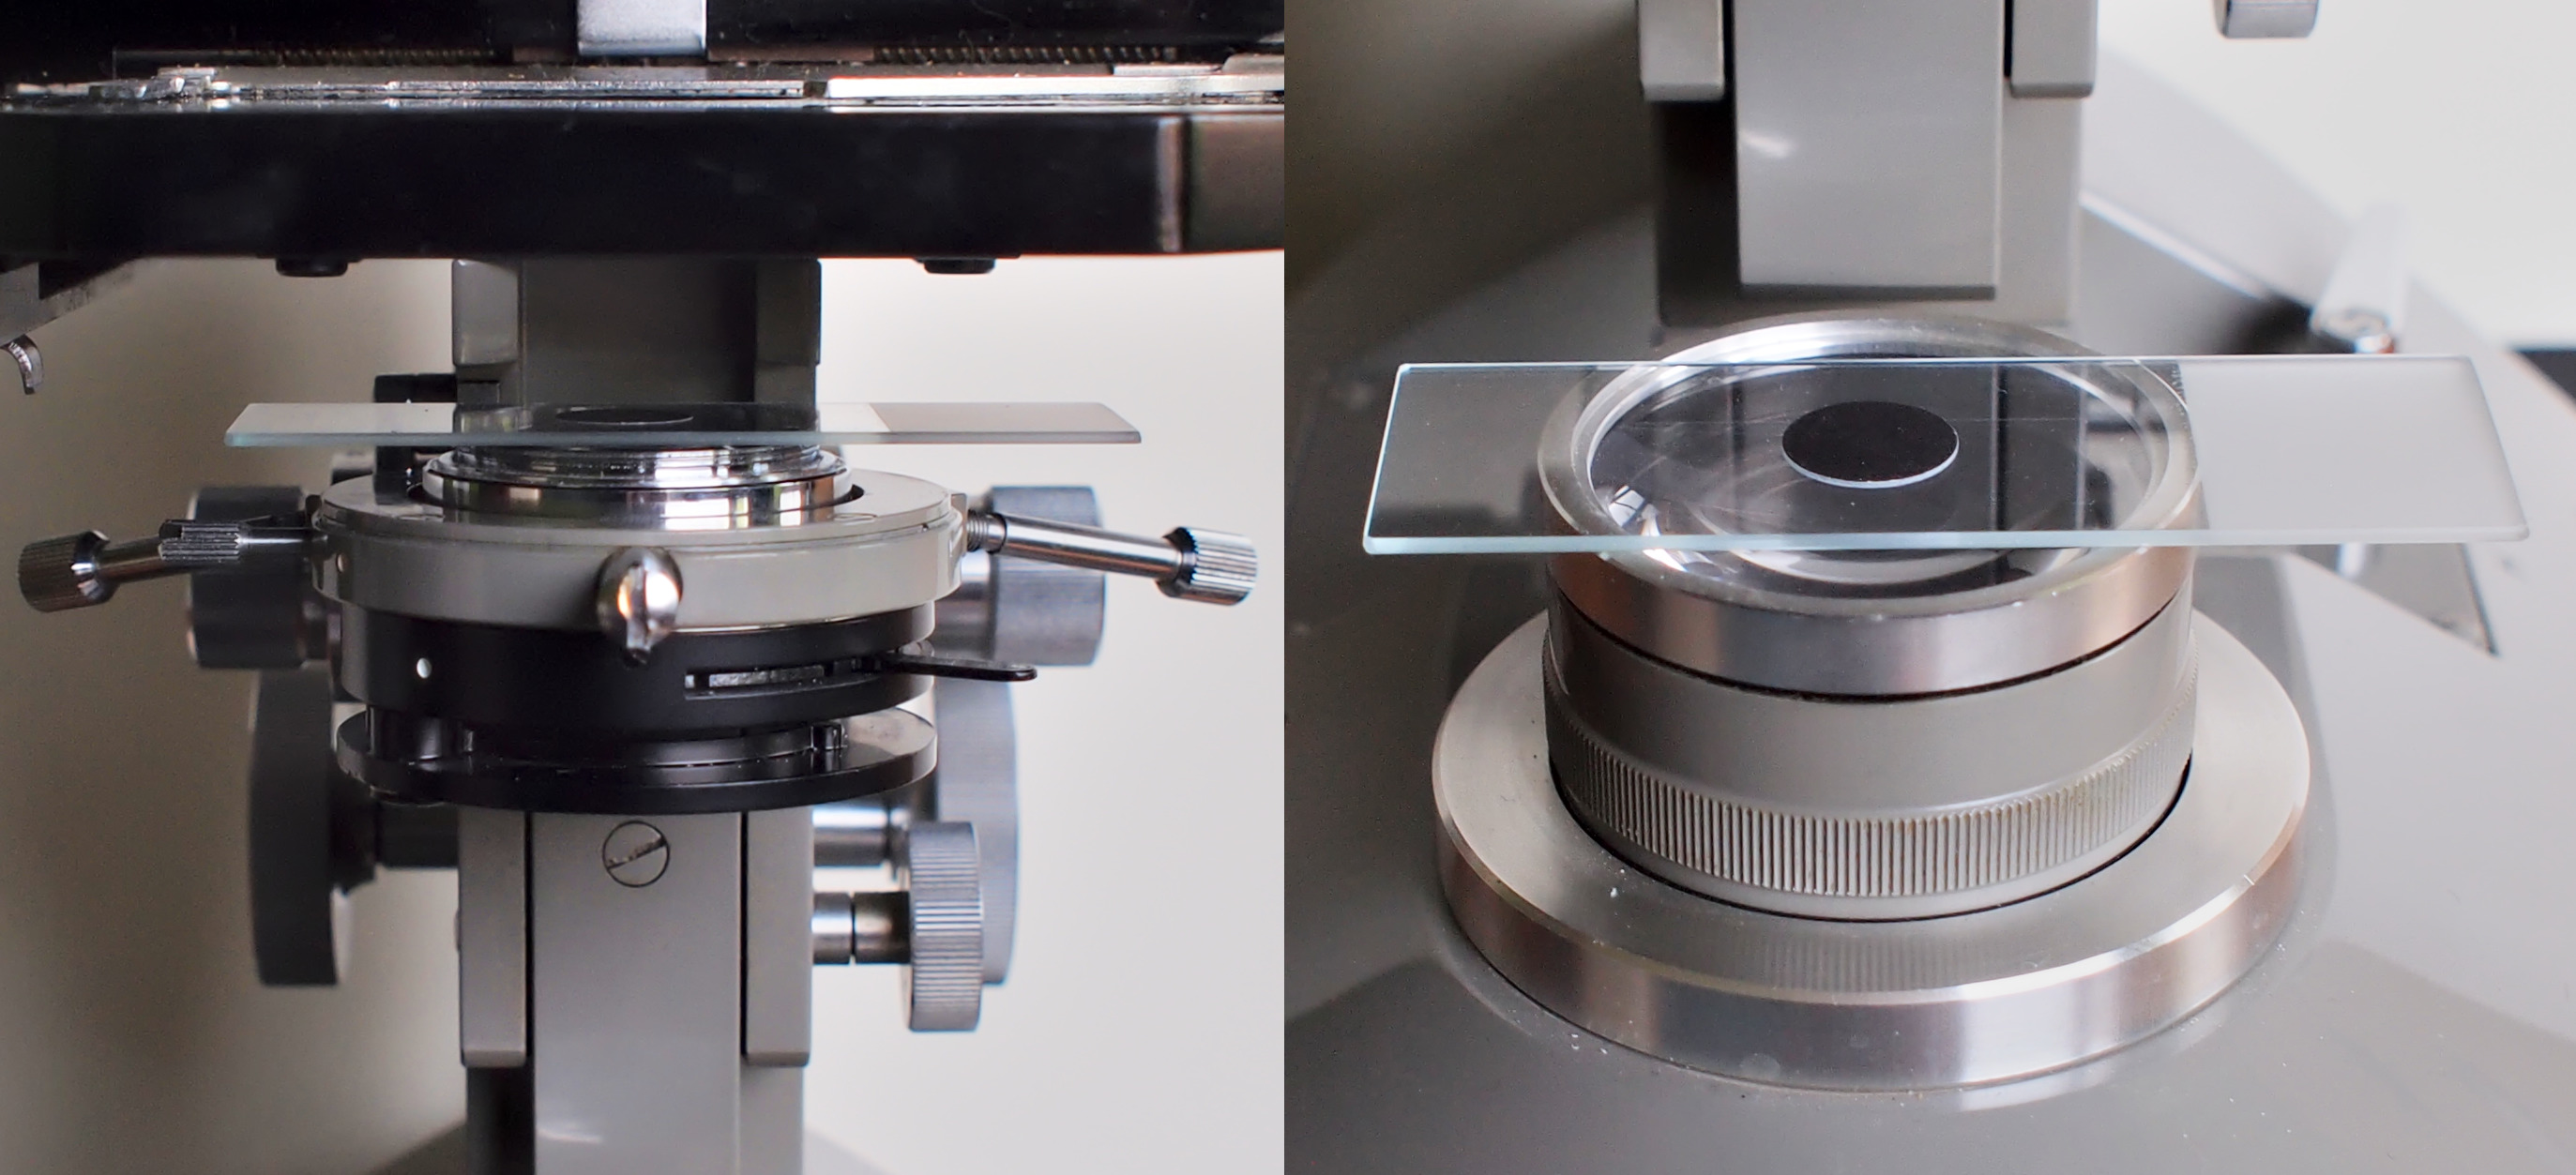
Left: 0.9 condenser on a Zeiss Standard 16 with the front lens of the condensor swung out. The slide is placed on the filter holder. An auxiliary lens is in place below the condensor holder. Right: slides covered with 19 mm and 12 mm stickers.

Illumination of the phase ring of a Zeiss Neofluar 40/0.75 Ph2, photographed through a phase telescope. Left: condenser with swung out front lens in the upper position, field diaphragm and condenser diaphragm fully open. Center: condenser lowered until no light is visible within the phase ring. Right: condenser diaphragm slowly closed until only the phase ring is visible.

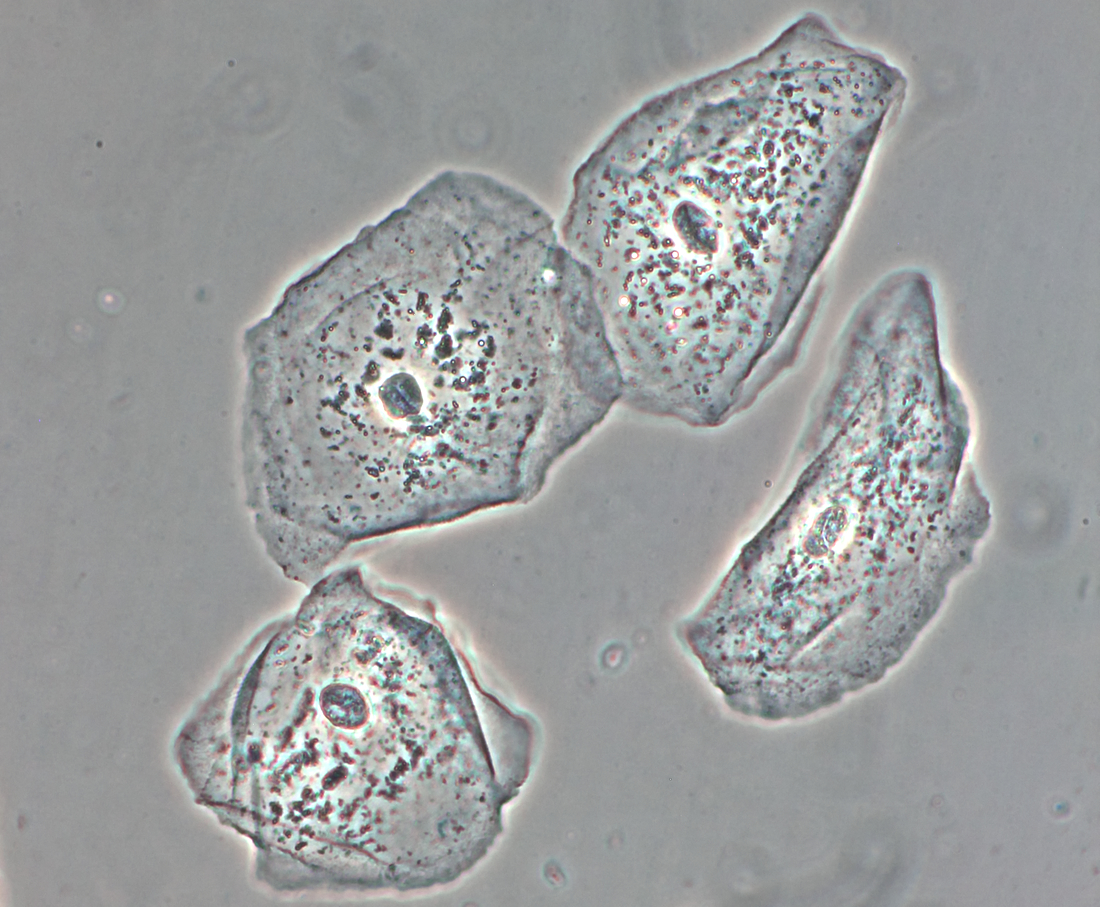
Cheek epithelial cells photographed in phase contrast with Neofluar 40/0.75 Ph2. Left: with a Zeiss phase contrast condenser II/Z NA 0.9. Right: with a brightfield swingout condenser NA 0.9 and the slide method. The results of both methods are comparable.
The phase contrast effect can also be achieved with Ph2 objectives by placing a slide with 12 mm stickers on the light exit. The advantage of this method is that the slide is more accessible, making centering easier. And if a Zeiss Standard doesn't have a filter holder, phase contrast can still be obtained this way. The quality of the phase contrast may be slightly lower at the edge of the field of view than when the slide is placed directly under the condenser.
Carl Zeiss Standard junior
In the case of a Zeiss Standard Junior with a 0.9 swingout condenser, the method described above is also used. However, the Köhler adjustment is not required as the first step, as it lacks a field diaphragm and a centerable condenser. The Standard Junior also lacks an auxiliary lens.

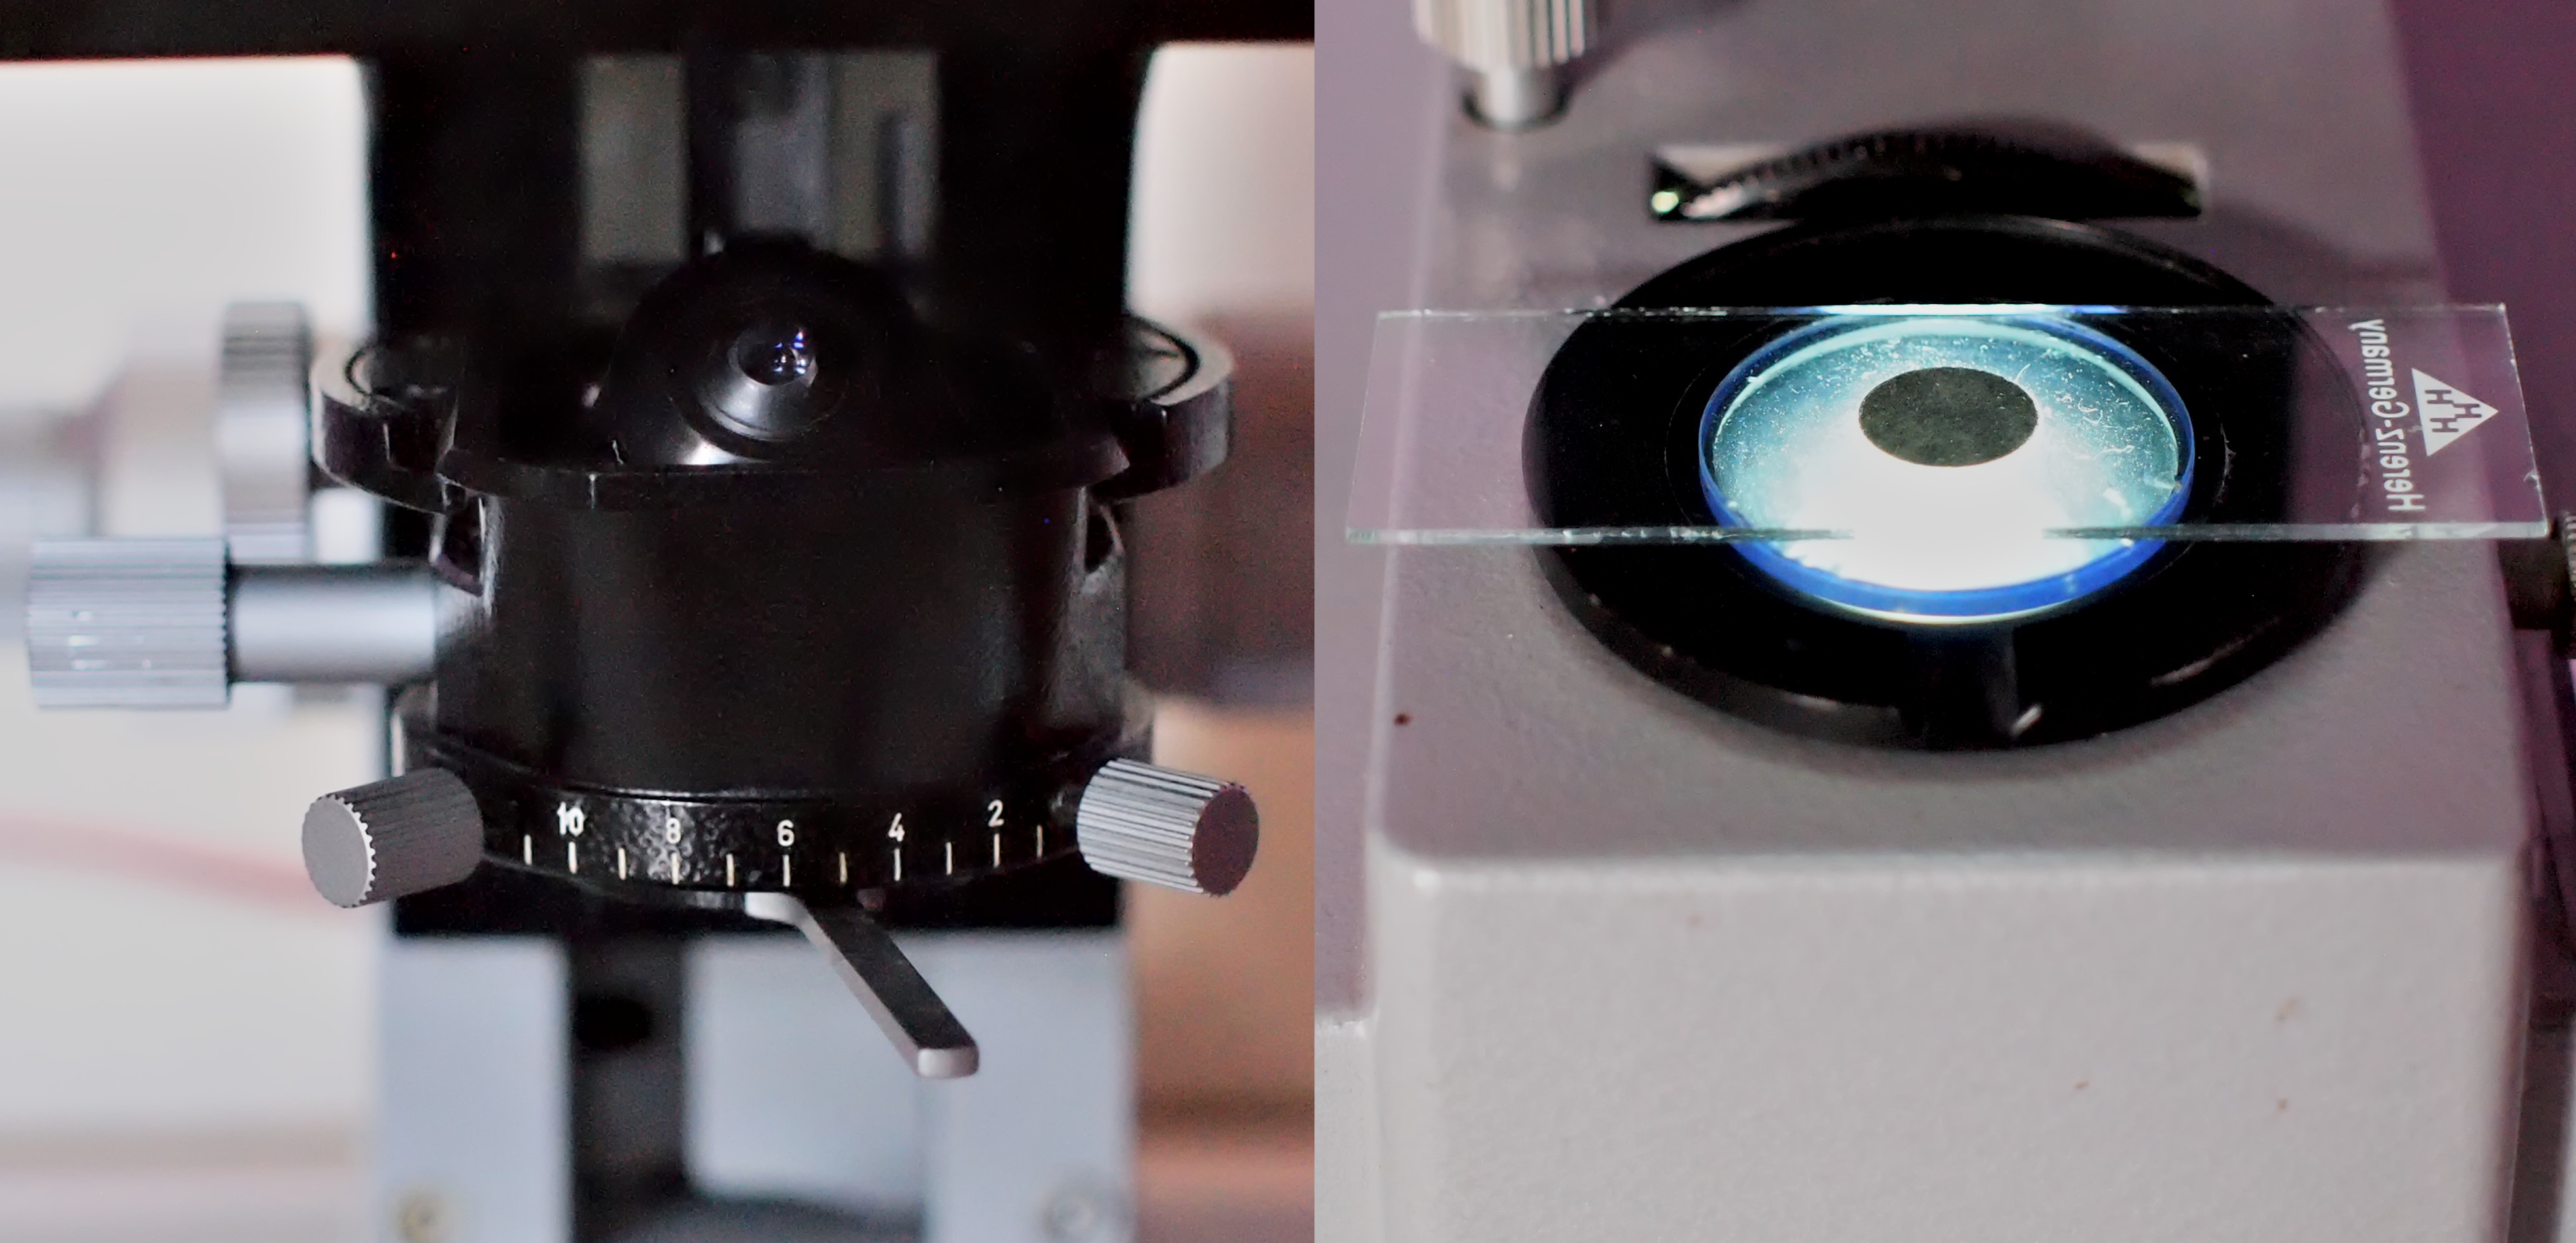
Illumination of the phase ring of a Zeiss Neofluar 40/0.75 Ph2 with a NA 0.9 swingout condenser, photographed through a phase telescope. Left: Slide with 19 mm sticker, not yet centered. Center: Black sticker centered and condenser at the correct height. Right: Condenser diaphragm closed until only the phase ring is visible.
Left: Slide with 19 mm stickers placed on the filter holder. Right: Cheek epithelial cells photographed in phase contrast using a Carl Zeiss 40/0.65 Ph2 objective and the slide method.
Zeiss-Winkel Standard Junior
The Zeiss-Winkel Standard Junior usually doesn't have a swingout 0.9 condenser, but a condenser with an aperture of 1.2. For phase contrast using the slide method, the top lens must be unscrewed. As the light source, I used a battery-powered LED lamp, available at various hardware stores, and placed a slide with 12 mm stickers on it. I performed the test with a Zeiss-Winkel 40/0.65 Ph2. The condenser is then lowered untill the light within the phase ring is no longer visible. The black circle is centered using a phase telescope, and finally, the condenser aperture is closed untill only the phase ring is illuminated.
Phase contrast using the slide method with the Zeiss-Winkel Standard Junior. Left: Zeiss-Winkel condenser 1.2 with the top lens removed. Center: Slide with 12 mm stickers placed on the LED lamp. Right: Condenser without the top lens in the lower position.
Phase settings with a Zeiss-Winkel 40/0.65 Ph2, photographed with a phase telescope. Left: condenser with fully open aperture in the upper position. Center: condenser is lowered until the light within the phase ring is no longer visible. Right: condenser aperture is closed until only the phase ring is illuminated, correct setting for phase contrast.
Cheek epithelial cells photographed in phase contrast with the slide glass method and Zeiss-Winkel objective 40/0.65 Ph2.
Phase contrast condensers for the Standard Junior are quite scarce on the second-hand market, making it attractive to use this simple method.
Olympus 37 mm objectives
Olympus microscopes with 37 mm objectives such as Olympus model E, FH or GB usually have a condenser NA 1.25. With this condenser, the top lens can be unscrewed and for phase contrast with the slide method this is necessary. For 40x phase contrast objectives I used 12 mm round stickers. For 100x phase contrast objectives larger stickers are needed and there I used 19 mm. The slide can be placed in three different ways: on the condenser (without top lens), on the filter holder or on the lamp. With 10x phase contrast objectives, stickers smaller than 12 mm are needed. I have not been able to test with these objectives yet. But for phase contrast, 40x and 100x objectives are the most useful.
Slide with 12 mm stickers placed on the condenser without top lens (left) or on the lamp (right) of an Olympus FH.

Illumination of the phase ring of an Olympus PL 40/0.65 phase-contrast objective photographed through a phase telescope. Left: Slide with 12 mm sticker centered. Center: Condenser at the correct height, complete obscuration within the phase ring. Right: Condenser diaphragm closed until only the phase ring is visible.
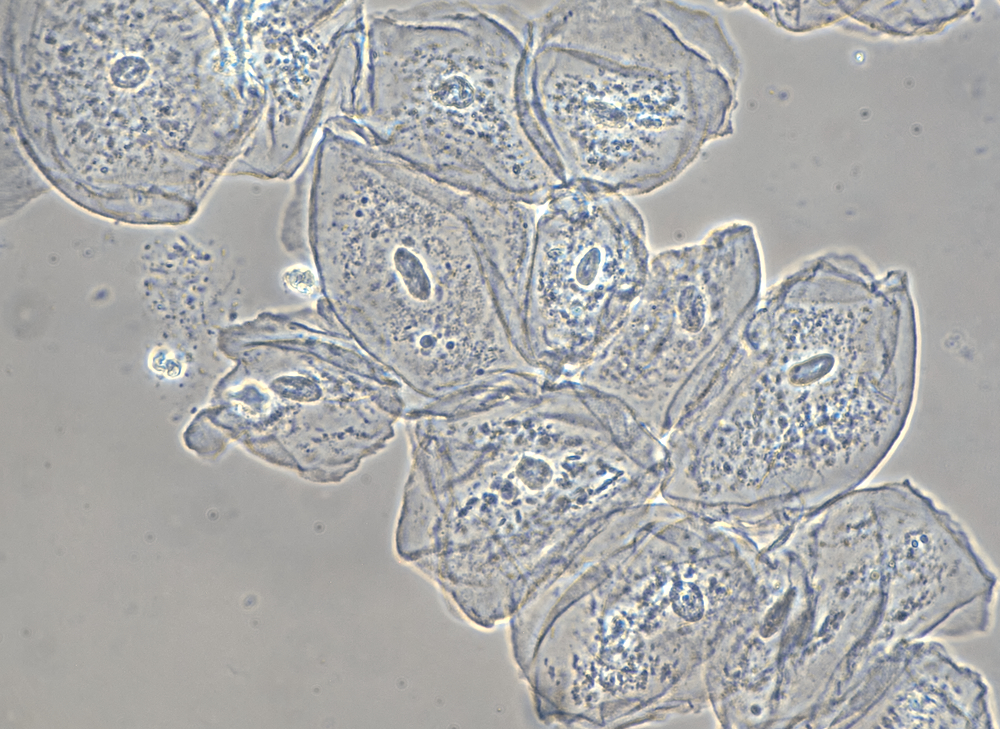
Cheek epithelial cells photographed in phase contrast with Olympus PL 40/0.65 and the slide method.
Leitz Dialux II
The following experiments were conducted using a Leitz Dialux II and a 0.9 achromatic bright-field condenser. I placed a slide with 12 mm circular stickers on the light exit. The test was performed with a Leitz Phaco 40/0.65 objective. The procedure was as follows:
1. Condenser with the front lens swung out in the upper position, condenser diaphragm and field diaphragm fully open.
2. A slide with 12 mm stickers was placed on the light exit, the black circle was centered using a phase telescope.
3. The condenser was lowered until there was no more light visible within the phase ring, re-center the black circle if necessary.
4. The condenser diaphragm was closed slightly so that there was no more light outside the phase ring.
Slide method with Leitz Dialux II. Left: 0.9 achr condenser with front lens swung out. Right: Slide with 12 mm round stickers placed on the light exit.
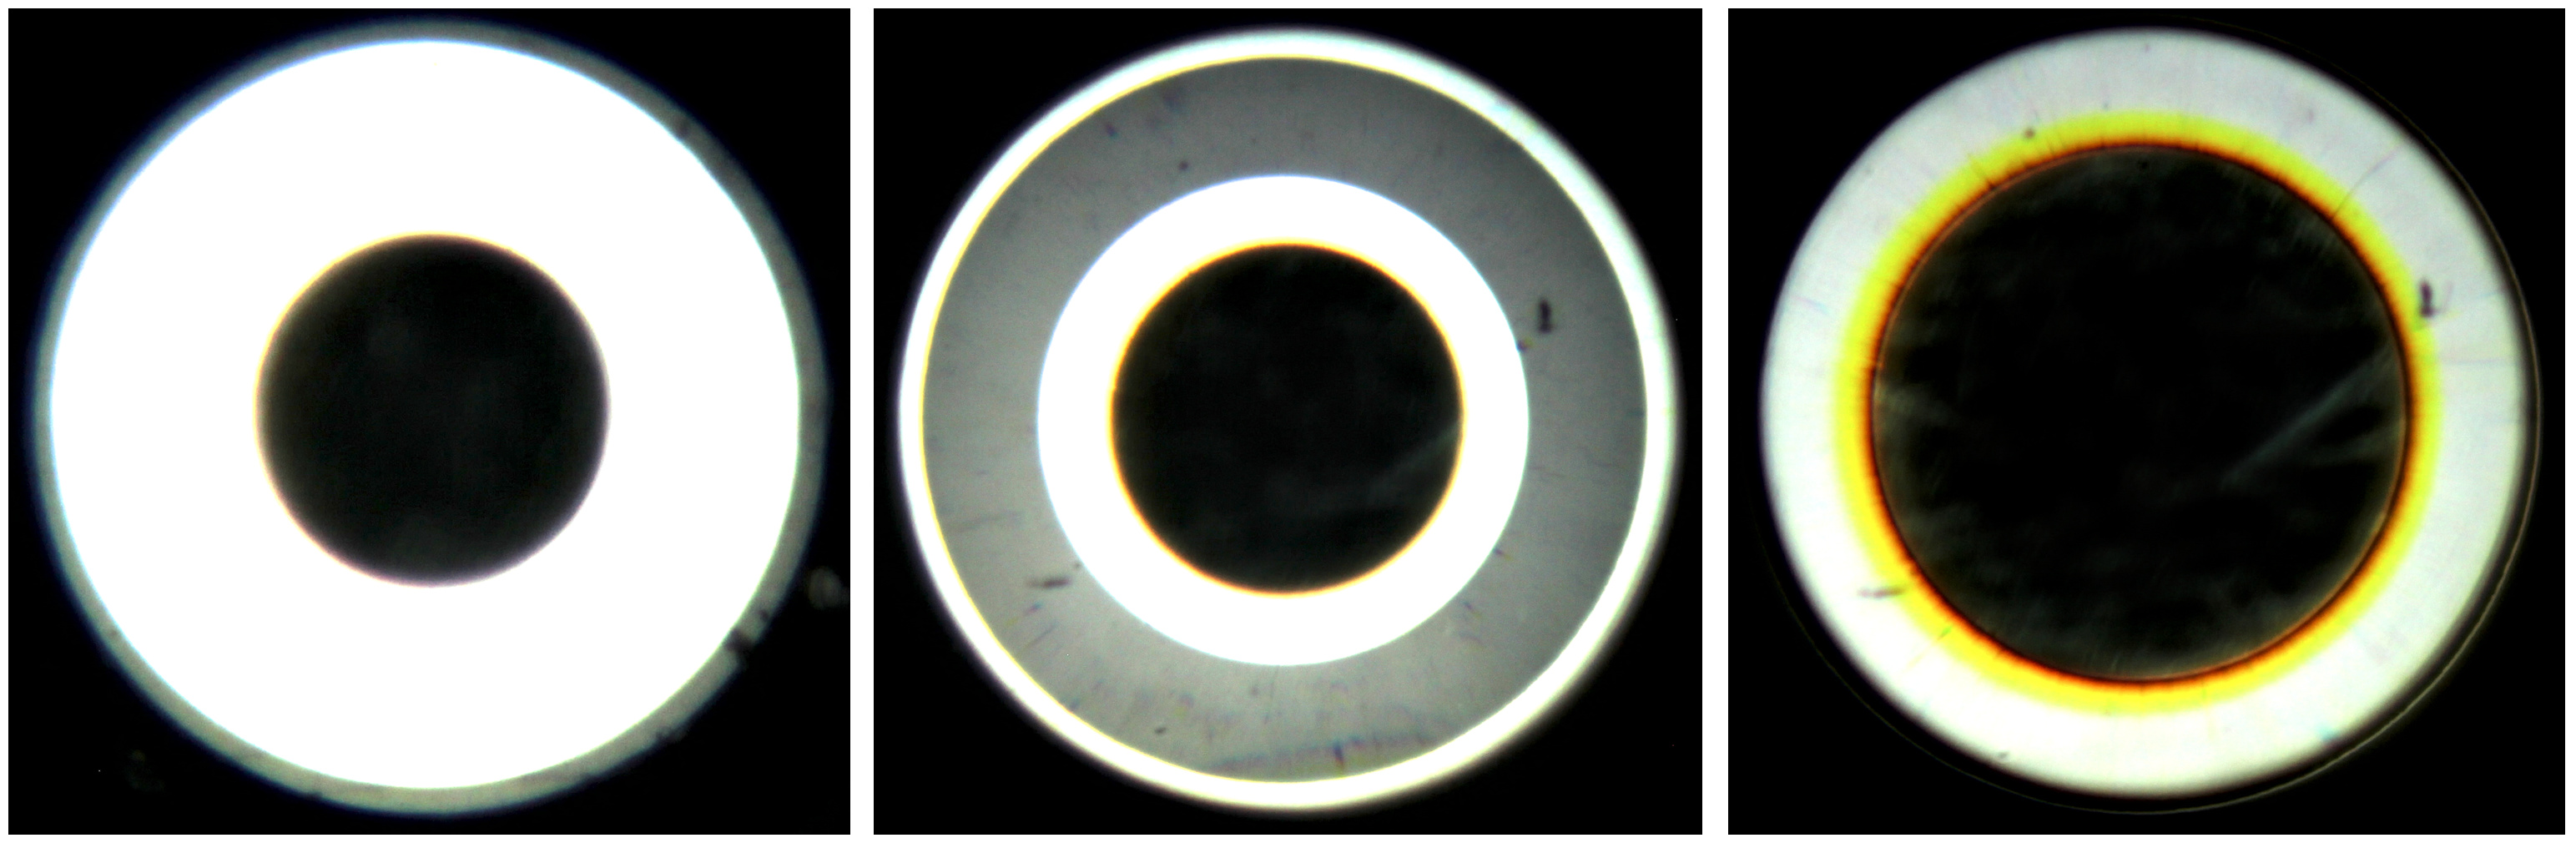
Phase settings photographed through a phase telescope. Left: condenser in upper position. Center: condenser lowered, phase ring visible. Right: condenser in even lower position, illuminating only the phase ring, correct phase contrast setting.
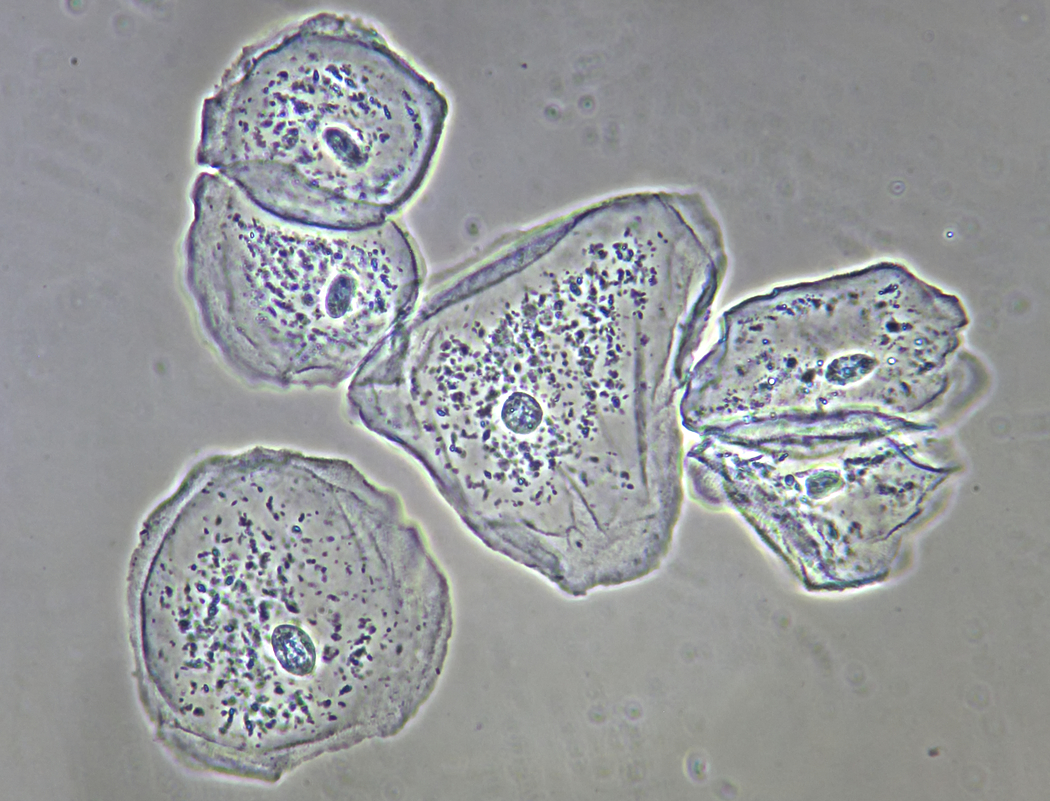
Cheek epithelial cells photographed with Leitz Phaco 40/0.65 and slide method.
Conclusion
Using a slide and black round stickers, phase-contrast illumination can be easily achieved without the need for a special phase-contrast condenser. The results with this method are comparable to those obtained with a special phase contrast condenser.